
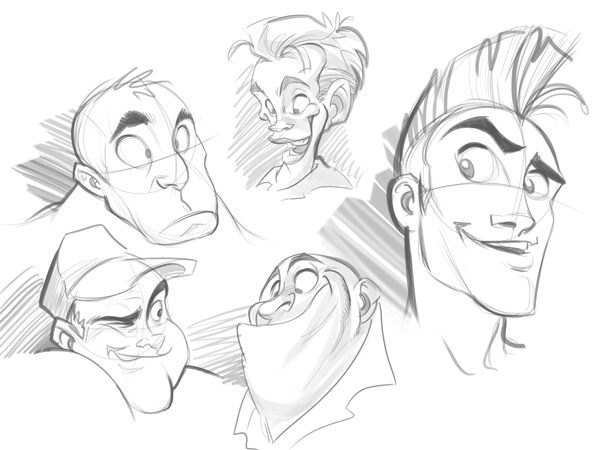
How to draw in Disney style. Animation Basics: How to draw a cartoon face correctly

Children are the main audience when it comes to cartoons. A good multiplicator is the only one who can extract the main details of an object, or a person, and simplify them to such an extent that the child can understand and feel what he is looking at. Children's masters such as Walt Disney, Hanna and Barber, Chuck Jones studied Jim Henson, Walter Lants and many others who could charm us with their magical characters.
My task is to help you find the right path, put together a puzzle and learn how to create any character using the presented technique. I guarantee that you will be shocked - how easy it is to create frivolous emotions that children (and adults) will love.
Understanding of human perception
A person has a very interesting feature: he can summarize the details of a very complex object into something simple and understandable. Thus, a person can represent any thing through several geometric shapes and curves.
Can you tell me that these two pictures show the same object?
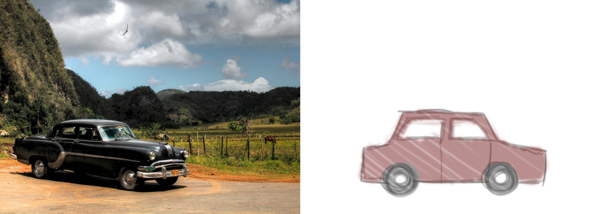
And let it be strange, but when you look at both of these pictures, you say, “This is a car.”
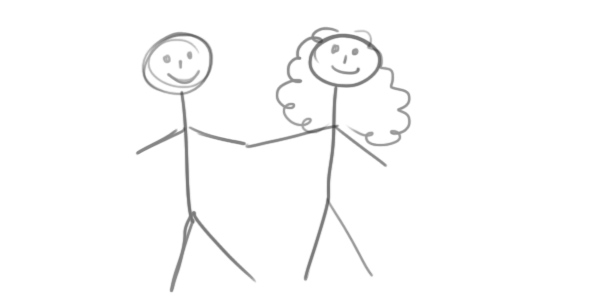
In fact, unlike artists, most people cannot name from memory all the details that make up a car, a dog, or even a child. Therefore, they begin to associate very simple and primitive forms with the specific characteristics of each object. How many children of 4, 5 or 6 years of age come from school with drawings that show two circles and several toothpicks, and say: “This is Mom and Dad!”?
 You probably don't want to draw like that, do you? So let's get our hands a little dirty and draw a few cartoon faces!
 1. Creation of the first character
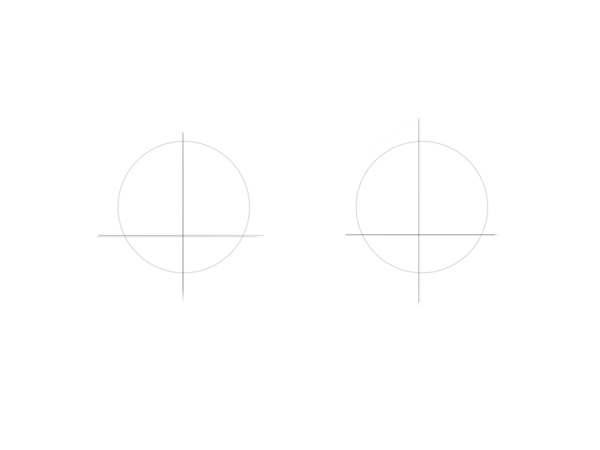
The main animated form is a circle. The Circle is All You Need (besides Love, of course). It is from the circle that you determine the basic proportions of your character’s head.

After drawing a circle, you must outline the axis of the face. Draw vertical and horizontal lines that intersect at the center, as shown in the image below:
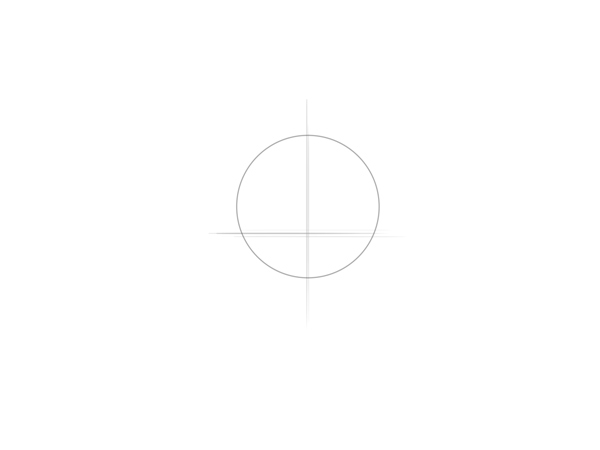
Step 1
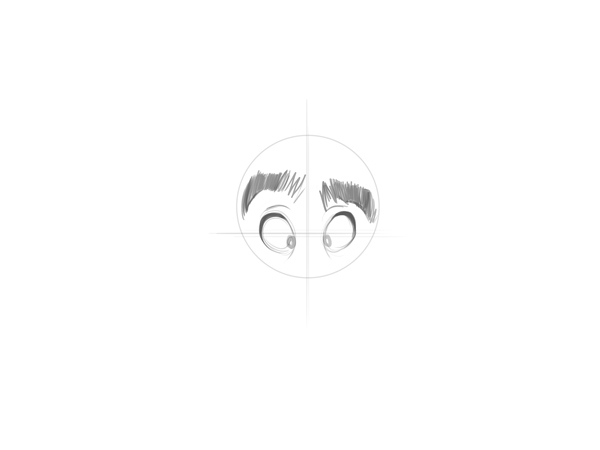
To make an eye, draw an oval with a slight inclination to the side above. Repeat on the opposite side. It is important to leave a gap between them about the same size as one eye. As we sketch, you can draw another eye in the center for accuracy.
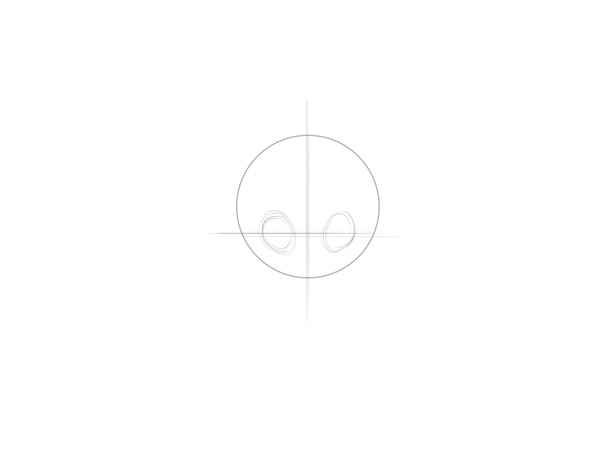
Step 2
Make the upper part of the circle oily, these are the eyelashes of our character. Position your eyebrows a little higher than your eyelashes, so that your expression will look surprised. The shape of the eyebrows is arbitrary, and with practice you will come to your own style.
Draw both pupils closer to the center (this is a very effective technique used by the main multipliers who want their characters to look cute).
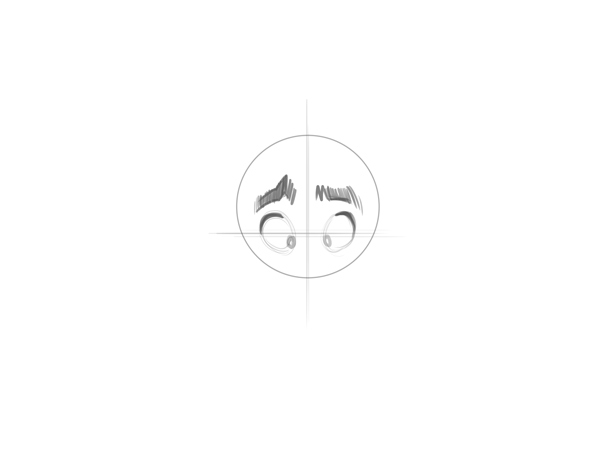
Tip: To add more life and “realism” to your eyes, draw a small line under them, something like a wrinkle. This is another very interesting technique that will add a special zest to facial expressions.

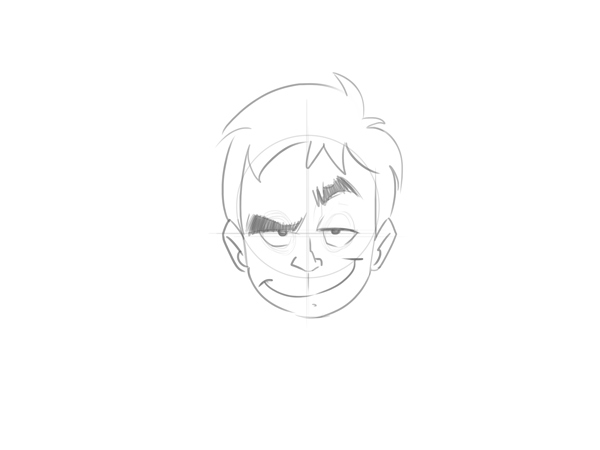
Step 3
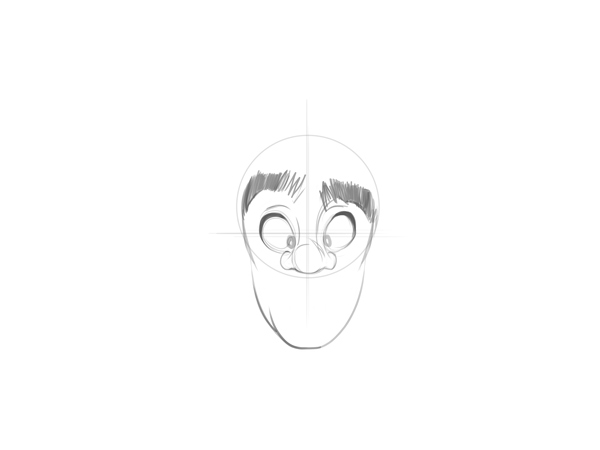
We got to the most creative part of our course. Think of it this way: in cartoon sketches, the main structure of the face is the skull and eyes of the character. It is at this stage that you identify the distinguishing features, i.e. it's clear to people that you are drawing a hero.
Now, when we come to drawing the jaw, we need to determine whether the character will be thin or fat. Do we want to create it young, old and so on? My character will be young. Let's draw him the right jaw.
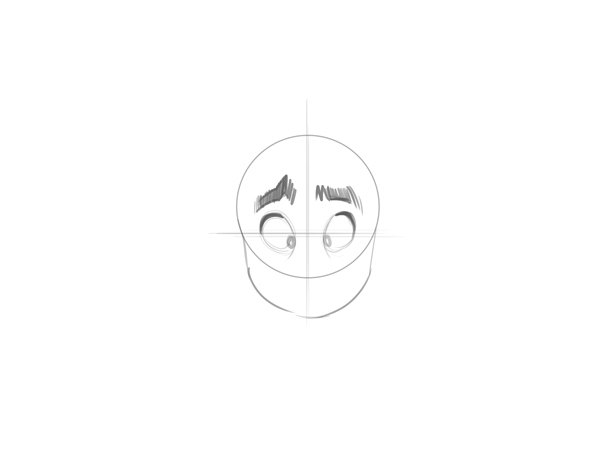
Step 4
When we draw the nose from the front, it is important not to add too many details. If you draw only the tip, the nose is already starting to look convincing. It is also very often in detail to draw only one side of the nose, based on the idea that this is the shadow side.
Let's draw our character the right nose.
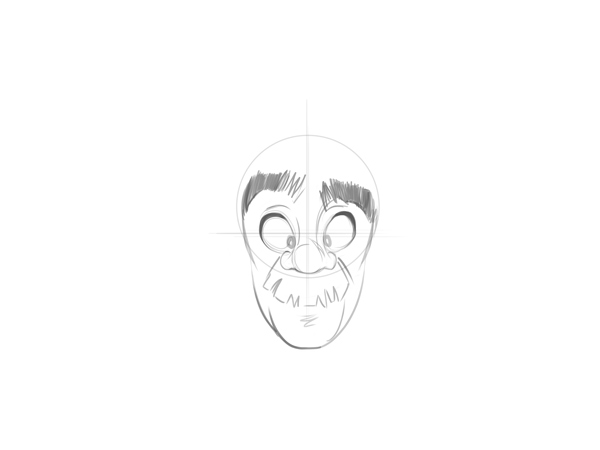
Step 5
As our character is a child, we will draw a cartoon mouth: something simple to convey an expression of innocence.
Please note that when drawing the mouth of a small child do not need to draw lips! In cartoons, children of both sexes have rather simple mouths. Good enough expressive features.
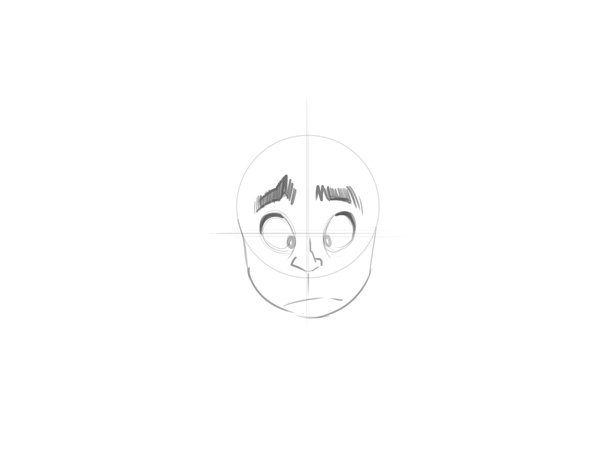
Step 6
The ears are visible from the front (because our character looks into the camera), so we will not depict the internal cavities. We will draw a simple form using a basic perspective (more on this later).
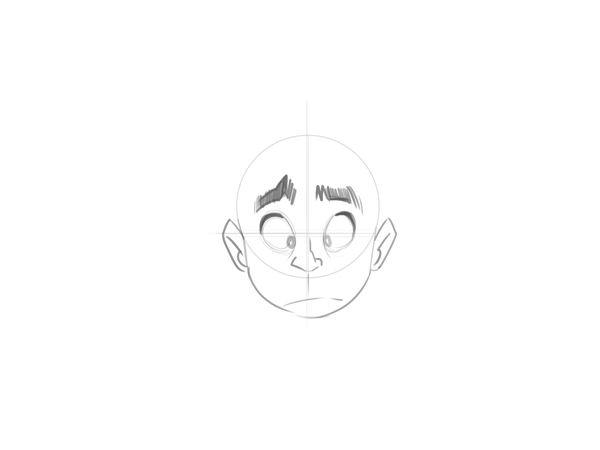
Step 7
The shape of our skull is already defined by the circle that we drew at the beginning, right? Now we need to draw a very simple childish hairstyle so that our boy comes to life. Let's do it.
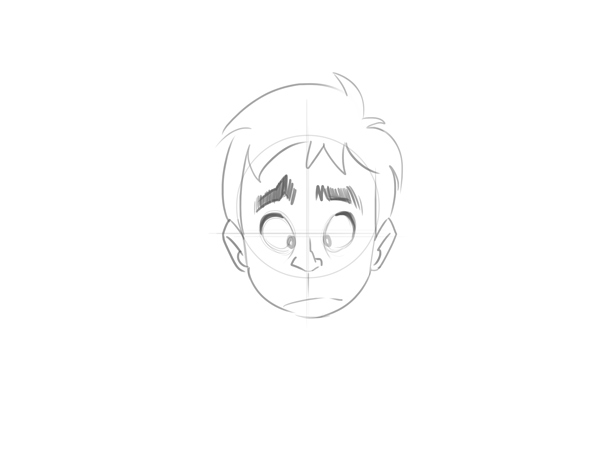
I do not know how to draw hair! Help!
Calm There is nothing to be afraid of. It is not necessary to be a stylist or a fashion designer to paint perfect hair. There is no right way to draw hair, so try it until you reach the ideal option for you. Just remember that hair reflects the personality of our characters. Oddly enough, hair can express age, rebellion, conservatism ... unbelievable, isn't it? By the way, what is your hairstyle ?! Okay it does not matter..
The exact and fast way to draw cartoony hair is to search for links to photos on the Internet! Do it all the time: scroll through fashion magazines or search on Google. Having found the perfect style, take the image as a base, placing it next to the drawing board (or tablet), and start drawing a cartoon and its simplified version.
Looks like we successfully finished drawing our character. Congratulations!
Now let's play a little more and draw a completely different character using the same template that we used to create little Tommy (yes, I gave him a name).
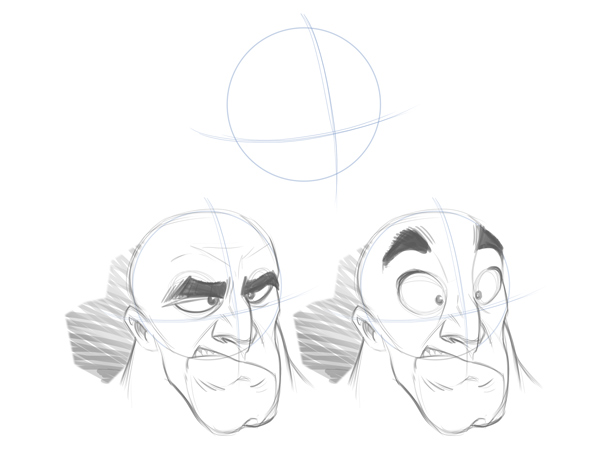
2. Creation of the elderly character
Step 1
As usual, let's start with the eyes. At this time we will draw faster, adding wrinkles, eyebrows and pupils.
Please note that we have changed not very much - just extended eyebrows. Older people have thicker brows and occupy more space on the forehead. Eyelashes for men do not matter, they are always painted the same.
Step 2
This time a little lengthen the chin. Try to do it like this.
Our character already looks different! Fine. Let's try to pick him a perfect nose.

Step 3
Following what we did before, let's create a nose. This time I will draw it in a completely different way:
Note that the tips of the nose are located very close to the corners of the eyes. This is an effective technique for creating wider and larger noses. The idea is to exaggerate the traits for a good result!
Speaking of exaggeration, we will not draw the mouth of our character in favor of another object.
Step 4
In this case, I decided to use a different technique: instead of drawing the mouth, draw a big mustache to create the best image of our character.
Done! Big expressive mustache for an old pal.
Step 5
Remember, I said that hair helps determine the age and personality of the character? Take a look.
We added hair on the sides and left bald spot on top. It's amazing how the view immediately changed, right? Notice that I drew the same ears as Tommy’s, our beloved boy’s. This is the advantage of working with templates. This is the magic of cartoons!
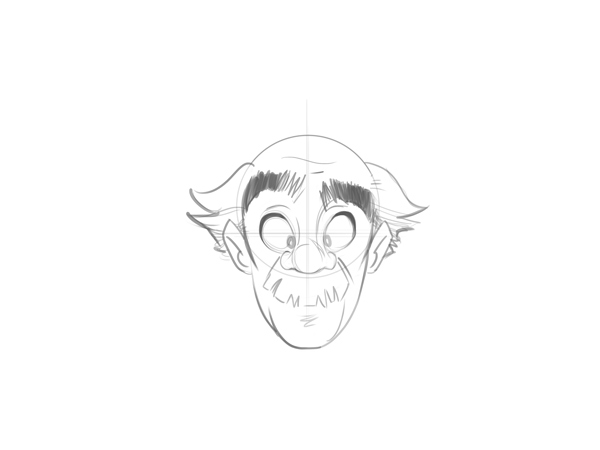 I think our new friend is a crazy scientist!
 3. Creating a female character
I don't even know .. I think Tommy needs a sister! He is so lonely. Like magic, we will create a sister for him:
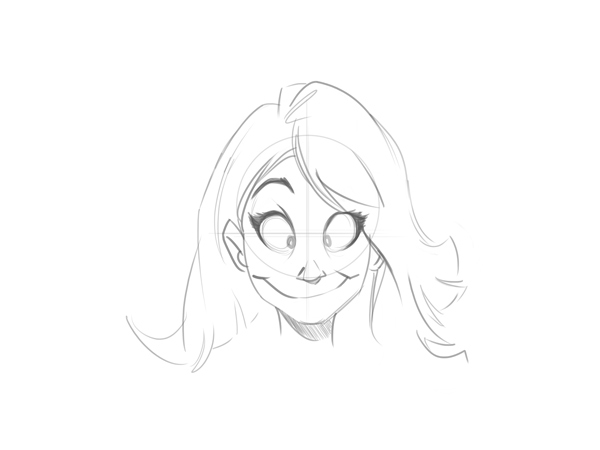
Hey! How did you manage to do it so quickly? Very simple .. Women have a more subtle structure of the face. Follow the step by step instructions:
- Thin eyebrows;
- Longer and expressive eyelashes;
- Neat chin;
- Small nose with fewer details;
- Long hair (draw, based on a real image, and using any style you want).
That's all. These are all changes that need to be made. Besides them, I used all the same details as when drawing Tommy, her brother. After all, they are brother and sister, right?
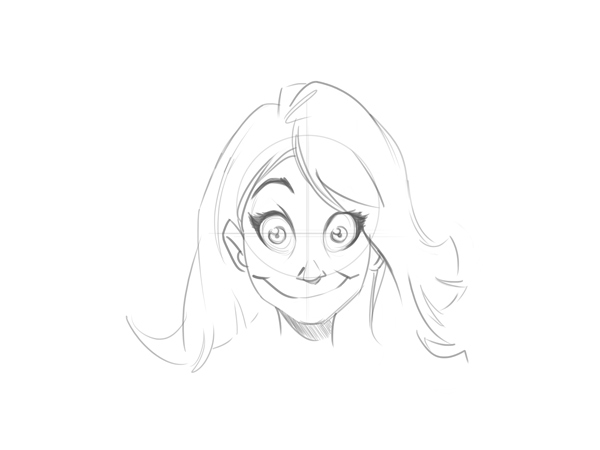
When you feel more confident, you can gradually add more “realistic” details to your characters. Such as larger pupils ..
4. Facial expressions
We are ready to add emotions to our dear Lucy (yes, that is her name). Let's draw it after she found out that school holidays are over ..
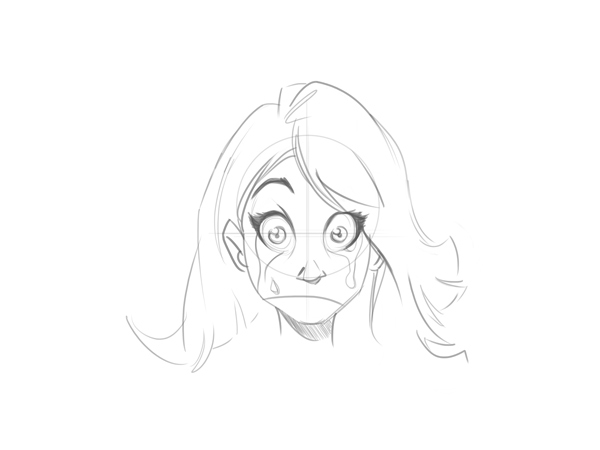
And again, we create something completely different by simply adding two elements: tears and a new mouth shape! Amazing isn't it?
Now back to Tommy and ask what he thinks about this:
 Hmm .. I have a suspicion that Tommy was up to something!
 Please note that I completely changed his facial expression by following these rules:
- Made one eyebrow lower than the other;
- He covered his eyes with his eyelashes;
- Added a smile (one corner of the mouth above - follows the eyebrow);
- He lifted the pupils, leaving them covered with eyelashes.
That's all! We got the desired result by making a few changes. Hair, ears, nose, chin and round shape of the eyes remained unchanged! How simple!
5. Side view
Draw the pattern again. Now we will learn how to draw Tommy and Lucy in profile:
Let's draw both faces:
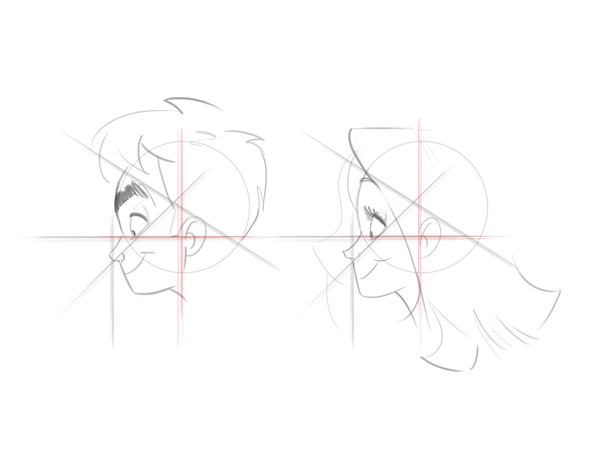 Note that in profile ear is located in the center of the circle.
 Remember the main differences in the structure of persons when comparing them next. Pay attention to these details when drawing female and male characters:
- Tommy Brows wider
- Lucy's chin is slightly forward.
- Lucy's nose is thinner and sharper;
- Lucy has long feminine eyelashes.
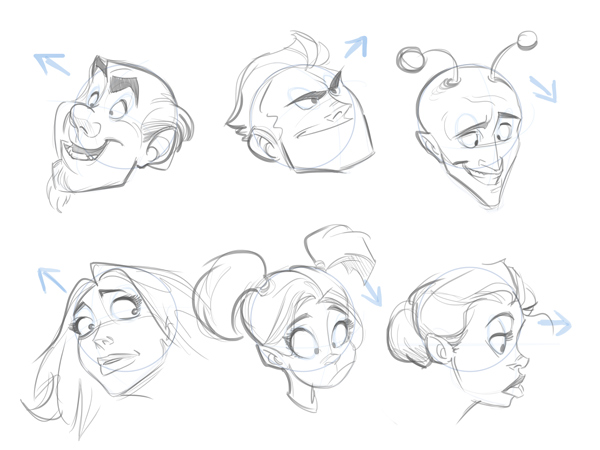
6. Play with angles
Eyes, nose, mouth, ears .. all the details of the face change shape when you change the angle. Cartoon characters are constantly looking in all possible directions from different angles, as they need to react to situations and objects around them. This makes them more realistic!
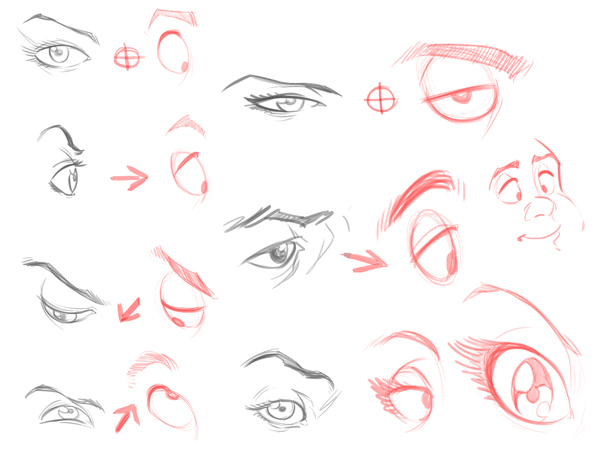 Please note that in cartoons the structure of the eye is simplified. In red drawn cartoon eyes. Compare their oval shape with the rounded shape of real eyes.
 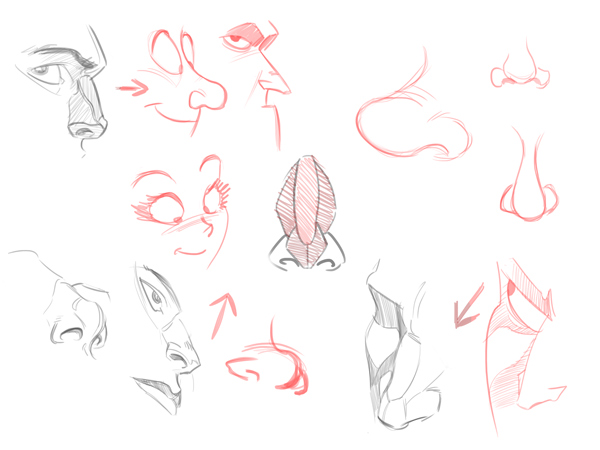 This nose is made up of several cartilages. Pay attention to how significantly simplified it is in cartoons.
 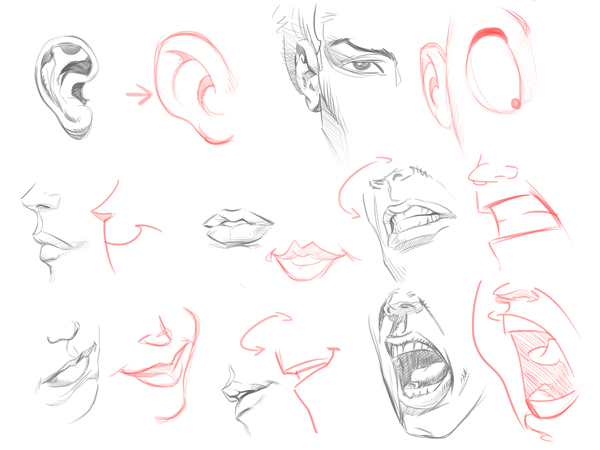 It is necessary to understand how the mouth behaves from different angles. Remove excess parts and try to keep only the basic shape of the lips. Ears are also greatly simplified.
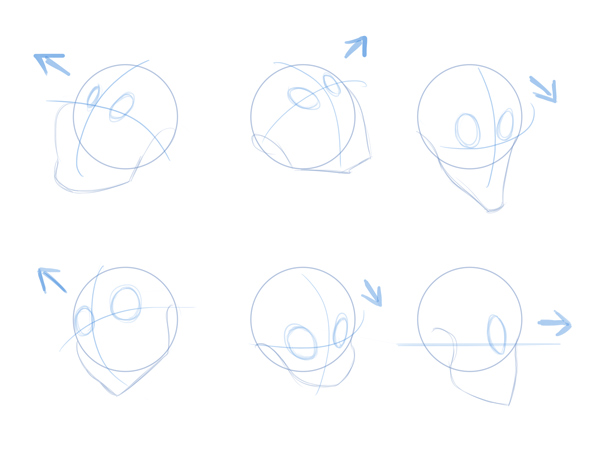
 Now we will practice drawing all the details we have learned. Below is a basic template (only circles and guides), where we can learn to draw different positions:
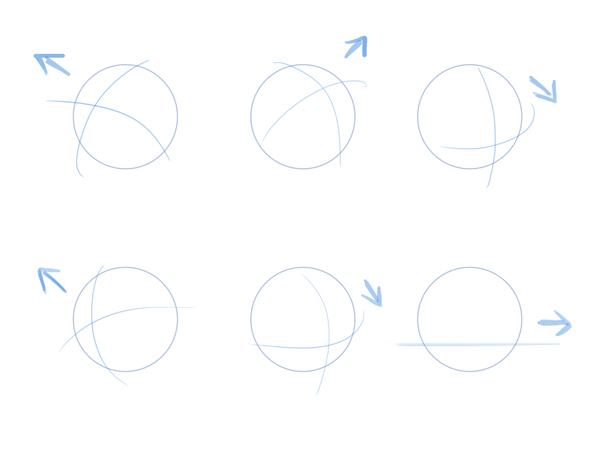
Mark the eyes looking in different directions on each of the circles.
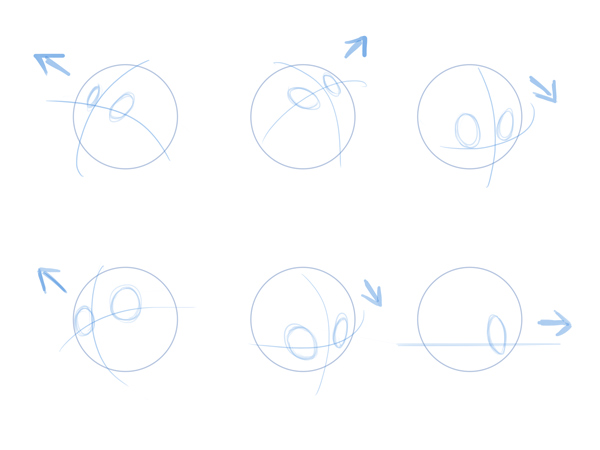
Now add arbitrary jaws of different sizes and shapes.
The choice is yours. I guess you can work independently and study the techniques that I gave you to complete the drawing. Remember the two main rules of animation:
- Simplify face details with rounded shapes;
- Make facial expressions exaggerated.
Once you learn how to sketch the direction of the eyes and choose the right chins, try using your creativity and draw as many faces as you like. You can be sure - the practice of the above-listed techniques for at least 10 minutes every day will make drawing cartoon faces the same habitual occupation as breathing.
Let's summarize! To consolidate the material of this tutorial, let us recall the correct steps in drawing cartoon faces:
- Draw a circle that will be the skull of the character;
- Determine the direction where the character will look and draw guide lines;
- Sketch an oval eye;
- Draw pupils (bring them closer to the nose if you want to create a cute character). Do not forget about eyelashes;
- Choose the right eyebrows, depending on the age and gender of the character;
- Draw the right jaw;
- Draw simplified ears;
- Search for hairstyles in Google (or magazine) and use them as sketches templates;
- Celebrate!
My version:
 An example of how to use one template to draw different emotions. Please note that only eyelashes and eyebrows have been changed. And nothing more!!!
 7. Study different ethnic groups
The manual is coming to an end. As a final piece of advice, I would like to encourage you to continue to experiment with facial expressions and, as far as possible, make more effort in researching individuals. Learn how the eyes and mouth behave in different situations. Take a look at the representatives of different ethnic groups and their distinctive features.
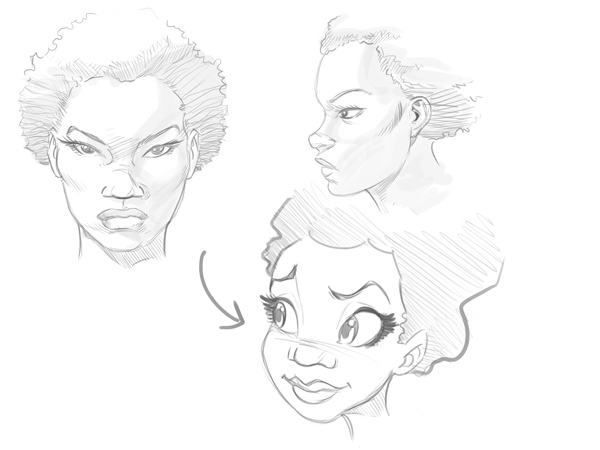 For example, black people have a slightly flat nose and more rounded cheekbones.
 If possible, try to make your characters as realistic as possible. Watch the behavior of people in real life. View photos, explore the style of your favorite artist or look for inspiration on the Internet. From real life, we can extract quality information for pictures. But remember: watching the real world does not mean copying! You want to create your character unique, not a copy of reality, right?
Great job! That's not all!
Now you know the basic techniques that used the best multipliers of the world. There is still a lot of things ahead, and this manual is just a small part of the training material that I have prepared for you. Let's dive.
 Learn the different styles and structure of the skull. There is no limit to perfection!
 (Translation of the Tara Leaver article “Finding your own artistic style: A practical guide” -
For many of us, the search for our own recognizable artistic style causes great difficulties. And this applies not only to newcomers to drawing, but also affects artists with experience.
Perhaps you begin to doubt before the brush touches the canvas, recalling the different criticisms of your teachers, or simply losing sight of the huge amount of different possible ideas and inspirations received from different courses. And maybe both immediately!
It is not surprising that when you find your style, you will feel just amazing!
Today i see some simple ways to find and develop your own style..
He is in every person, just need to help him prove himself. We develop it through constant practice and exercises, but there is also an unconscious part, one that does not come through “hands,” but from the heart.
I know that this idea seems obvious; nevertheless, it is this combination that allows us to start working on developing our individual style. Received from the outside, this idea gives you the opportunity to more clearly imagine where it is better to start learning about your creativity and look for your style.
Everything that you read below is not complete information on this topic. These are just starting points for you in your search for your own path.
Take your last job, put it in such a way that you can see it comfortably. Answer questions consistently, noting your reactions and observations along the way. If you want, you can make written notes.
We go in search of treasure!
The main treasure is your own creativity.
Consider what you draw most often.
- What themes and stories attract you to drawing the most? If you are at a loss with the answer, glance in the pictures and folders with works in search of the answer.
Personally, I try to memorize my preferences in plots, how often I work on a particular topic. And somewhere at home I have a sheet from a notebook where I write down this information. So, when I find it difficult to answer the question about my favorite subject in drawing, I look at myself or this sheet.
So, I like to draw boats! And still fishes, figures and trees.
The list of favorite topics should not be completely complete or exhaustive at this stage. It is enough to highlight a few of them in order to have a starting point.
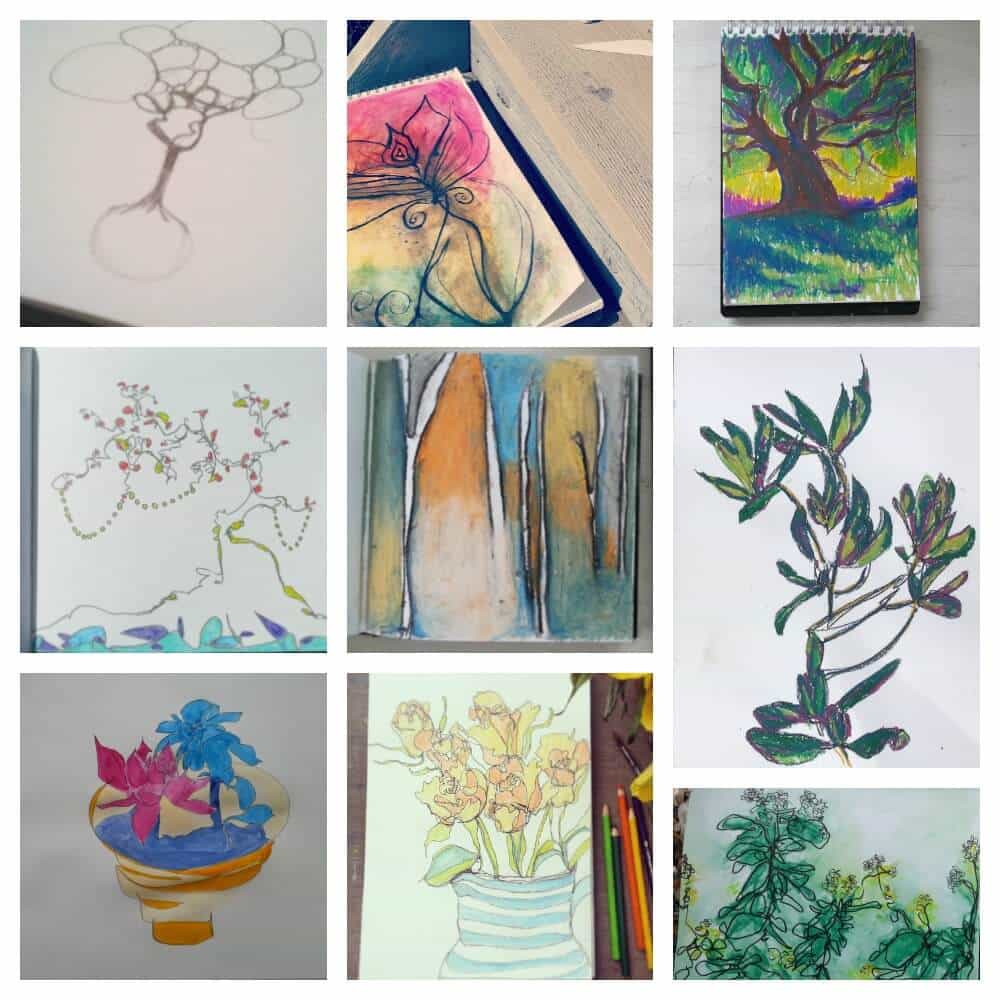
A selection of works with experiments and creative searches on the theme of trees. You can see the common features of the connecting work - winding lines and contour drawing.
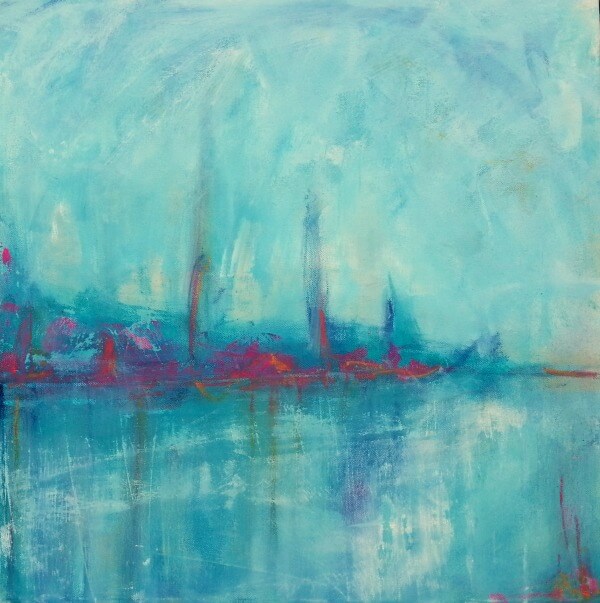
What colors do you like?
- Think of the default color palette.
- What can your latest work tell you about repeated color choices?
Recently, aqua, blue, Nepalese yellow, fluorescent pink and white, which I use acrylic gesso primer, have entered my working palette. It gives me a good range of dark, medium and light tones. I really enjoy playing with these flowers, they fully meet my needs and requirements at the moment.
what about you?
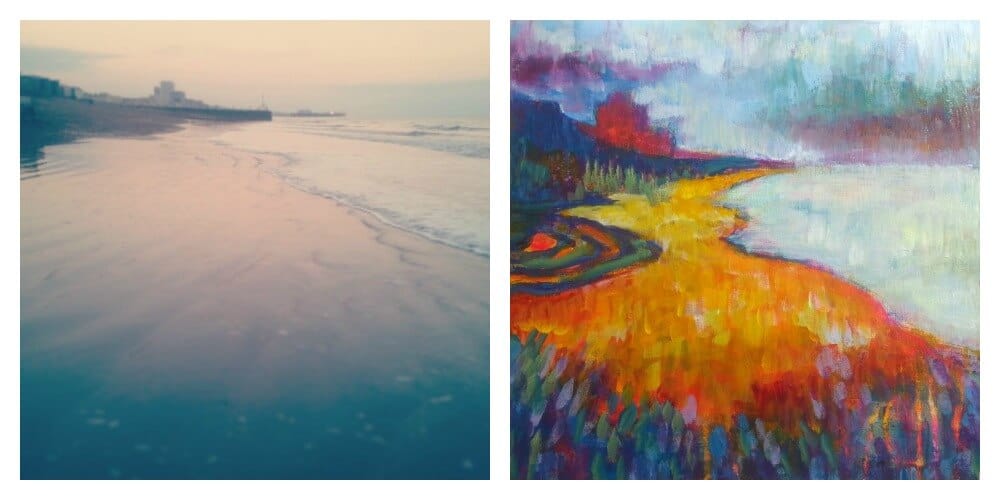
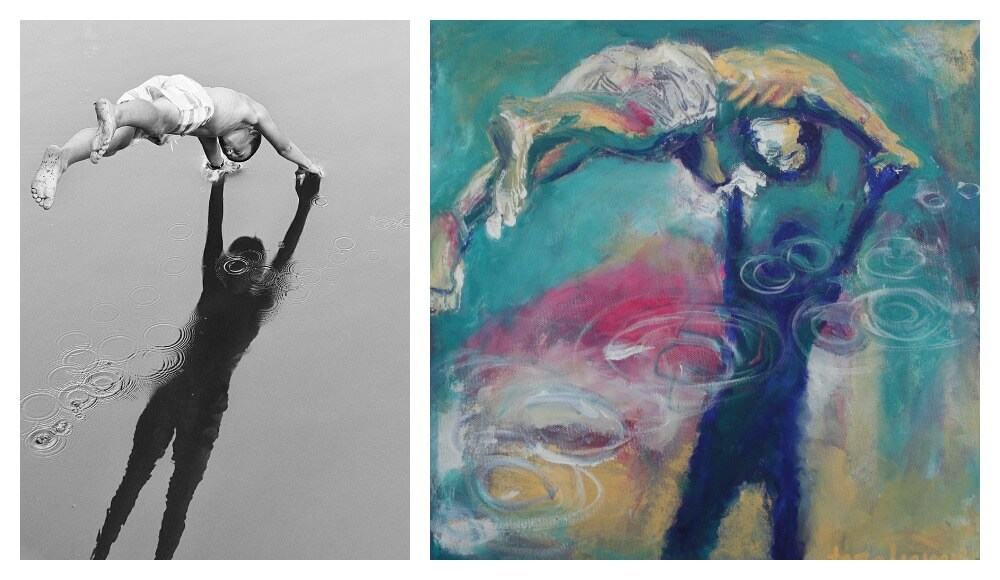
On the left is my photo, on the right is a drawing on it. I used colors from my “palette” and experimental technique.
What are your style features?
- What do you like better - graphic lines or work with large areas of color?
- Do you like to use unusual tricks when working with a brush?
- Or maybe you prefer not to use a toothbrush for spraying?
- Do you like to create so-called patterns, patterns, or do you prefer to work with greater imagination and scope?
Features of my style are contour lines, often uneven and blurred, sometimes “dirty” in color. I am inspired by the works of Egon Schiele. I also love the nervous color contrasts, sophisticated-flexible pattern.
Analyze what techniques you especially like and are close, give a sense of satisfaction with their creativity. Develop them, stick to their future work.
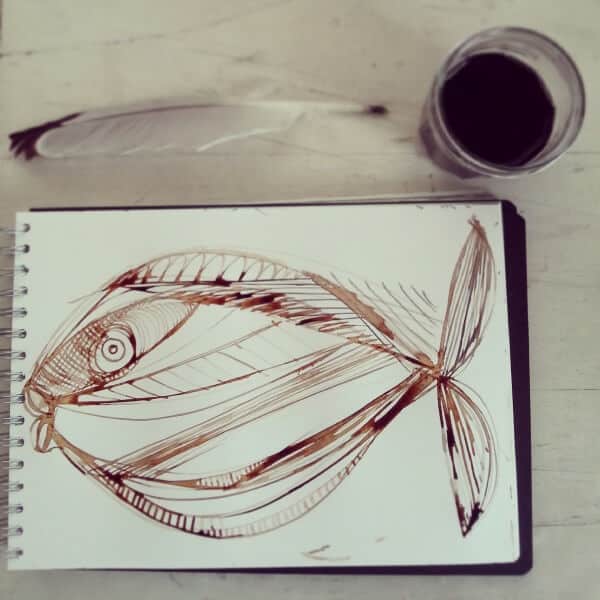
Figure fish, made with a nut-colored ink. Experiment with lines.
What technique, art material do you like?
- You may have several. What do you like most?
I really love working with oil pastels. But most of all I like working with acrylic and using a medium in my work. This allows me to control the process of drying paints, to play with the result. It dries quickly and is easy to clean.
If you have one favorite technique, it means that you can explore all of its possibilities, improve your skills, and therefore your work as a whole.
I did not use references for this work. There are only two of my favorite material - acrylic and oil pastel.
What inspires you?
So, we have reviewed the main issues that need special attention in the search for their style. Now let's digress a little, look at the works of other artists and think about what we can borrow from them for ourselves.
I recommend doing this after you answer the four previous questions. Before you start to consider and evaluate the work of other artists, you need to start to deal with their work.
If you are sure that you have identified for yourself the main features of your work, this makes it easy for you to search for works by other artists who are close to you in their style and vision of the world. It will be easier for you to evaluate their work, and look for features that you would like to add to your work, your style.
It is designed to collect and share visual information. There are a lot of different pictures, photos and images. Ask a few key queries, look at the result.
You can create your own personal board, which you will collect (pin - pin it!) Everything that will inspire and interest you, be it an interesting composition in one picture, a different color palette, the style of the artist on the third or the plot of the fourth.
On my board I do not collect paintings by other artists. I do not do this because they do not inspire me. I just want to be free from what other artists were painting at the moment when I start creating, to search for my own plots and solutions.
This will partially help you reference photo (photo source for drawing). They can do you good service, so keep them always at hand or keep photos on your Pinterest board that inspire you.
In addition, carefully looking at the photos you collected, you will certainly see clues about what you are interested in at the moment, and what to do next.
Yes, Pinterest is like a rabbit hole! If you can not put it down, put a timer.
On the left - a photo from Pinterest, on the right - my work, for which this photo inspired me.
Errors novice artists
The main audience are children when it comes to caricature. A good cartoonist is one who can highlight the main details of an object or person and simplify the shape so that the child can recognize and be attracted to what they are viewing.
Your role is here, so that you would understand how to correctly assemble this puzzle and definitely learn how to build any drawing on this technique. I guarantee you will be shocked at how easy it is to create cartoon characters that kids (and adults) will love!
General information about human perception
The human being has a very interesting feature: We can synthesize the details that make up the construction or object in very complex relationships in the most basic and simple. Thus, we can represent any type of thing through several curves and geometric shapes.
Can you tell me if the two images below represent the same object?
Strange as it may seem, you can look at two photos and say: "This is a car."
It happens that, unlike artists, most people cannot tell from memory all the details that make up a car, a dog, or even a child. Therefore, they begin to associate basic and primitive forms for the specific characteristics of each object. How many children of 4, 5 or 6 years came from school with drawing two circles and some sticks on a piece of paper and said: “Here is Mom and Dad!”?
1. Create our first character.
The main form of the caricature is a circle. A circle is everything you need (besides love, of course). This is from the circle that indicates the basic proportions of the character’s head.
After the circle is ready, it's time to trace the axis of the face. Draw a vertical and horizontal line intersecting in the center, as in the image below:
Step 1
For glazoruyte oval shape with a slight inclination to the side at the top. Repeat on the opposite side. It is important to leave a gap between them approximately the same size as the eyes. Since we are in the editorial phase, you can take another eye in the center to serve as a yardstick.
Step 2
At the top of the circle, slightly thicken the line, which will be the eyelashes of our nature. Place your eyebrows slightly above the eyelashes to hold a peculiar expression of surprise. The shape of the eyebrows is free and with time you will adapt to your own style.
Draw your eyes towards the center (this is a very effective tactic used by the largest multipliers, whose sole purpose is to make our characters look prettier).
Tip: To give more life and "realism" in our eyes, you can draw a small line under them to mimic the look of wrinkles. This is another very interesting tactic that gives a special touch to our facial expressions.
Step 3
We come up in the most creative freedom of the whole turn. Think of it this way: In the designs of a cartoon style, the main structure of the face is the skull and eyes of the character. It is at this stage, where you define identification with the outside world, IE, it is already clear to people that you are drawing a character.
Now, when we approach the jaw, we will decide what character we need. Maybe an old man, young and so on. My character will be young. So let's develop a proper jaw for it.
Step 4
When designing the nose, we consider it from the front, it is common not to use a lot of details. If you draw only its tip, it is likely that it already achieves a convincing effect. This method is also very common to draw in detail only one side of the nose, from the idea that it is the opposite side of the light.
Let's draw the right nose on our character.
![]()
Step 5
Since our character is a child, we will make a cartoon mouth: something simple is just to represent an expression of innocence.
Please note that when drawing up the mouth of a small child, lips should not be made! In a cartoon style, children, regardless of gender, have fairly simple mouths. A good and expressive track is already doing its job.
Step 6
Ears can be seen from the front side view (because our hero stands in front of the camera), so that the internal cavities will not appear. Then we will only make a simple form using some basic points of view (more on this later).
Step 7
The shape of our skull is already determined by the circle which we made at the beginning, right? So, we need a very simple and childish haircut to give life to our boy. Let's do it now.
I do not know how to draw hair! Help!
No one needs to be a stylist or fashion designer to make perfect hair. There is no right way to paint the hair, so you have to try it until you create the perfect haircut you want. Just remember that hair is responsible for determining the identity of our heroes. Oddly enough, hair can express age, conservatism ... By the way ... how do you like a hairstyle ?! Oh never mind
The exact, quick and easy way to draw cartoon hairstyles is to search for photos online! I do it all the time: take a fashion magazine or search Google. After finding the perfect style, place the image as an example next to the drawing board and start making a cartoon and simplified version.
Well, it seems we finished our character successfully! Congratulations!
Character - a fictional animated person with a certain character and unique external data. In art, characters are divided into two main categories: animated and static. The fundamental difference between an animated character and a static character is in the special construction of the character, thanks to which the work of animators with the hero will be greatly facilitated.
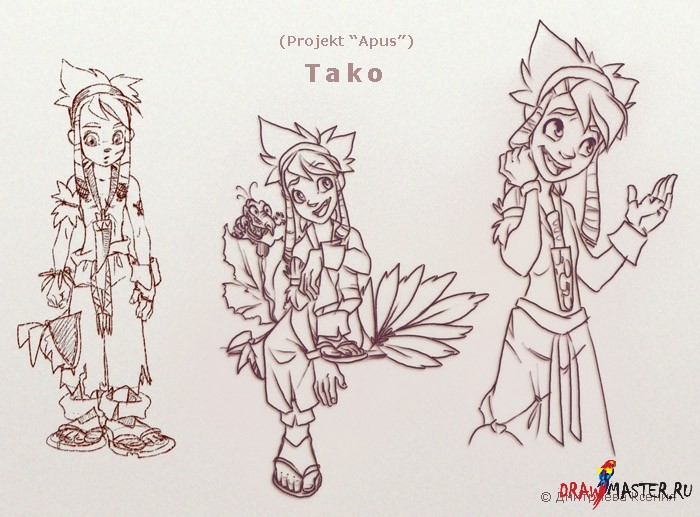
DEVELOPING AN IMAGE OF A CHARACTER
The search for the image of the character is the most responsible and interesting stage. When choosing an image, it is necessary to take into account not only the personal qualities of the hero, but also his harmonious combination with the surrounding world. Also, the character must be expressive and "not beaten", have a certain amount of charm.
To begin with, it is necessary to study the introductory materials (TK, script, literary and directorial description of the characters), to communicate with the director, who will try to convey his thoughts to the artist as accurately as possible. To get acquainted with the features of the style of the project, about which the production designer will tell, or the director, if at the stage of creating the characters of the production designer on the project yet. According to the results of acquaintance with the project, it is worth making a number of sketches, noting for yourself some of the most important points that will be useful in further work with the character.
First of all, it is necessary to present the brightest episodes from the read script, and try to cover simple concepts of the most impressive scenes with the participation of the main character. This is done in order to feel the main signs of the future character - his weight, posture, physique.
Once you have managed to catch a suitable image in your opinion that has blurry, but already more or less clear outlines, you can begin to refine the style - search for the shape of hairstyle, clothing, personal items without going into details. At this stage, you should not cling to some successfully obtained image. The task of the artist to draw many different options unrelated, of which the most successful will be selected later.
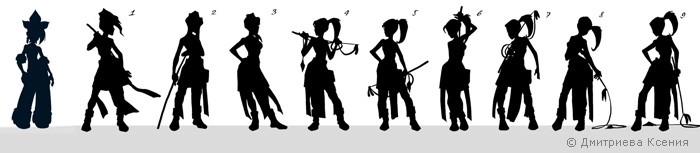
Do not forget that the character should be easily "read" by the viewer. To check the character's "readability", it is enough to paint it with black color.after which the silhouette of the character should be recognizable and look quite impressive.
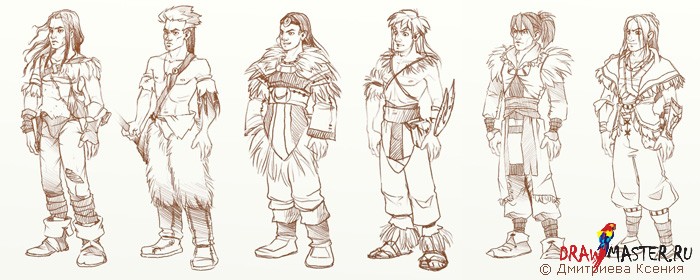
The next stage is the running in of the character.
The selected, but so far raw version is played up in action. To do this, you need to draw a character in his inherent poses. Unnecessary details in the course of work are excluded and replaced with new ones, more suitable for the hero and the most convenient in work.
The final stage in creating an image of the character, as a rule, is started after the approval and adjustment of the most suitable option chosen by the director (customer). Now the artist's task is to work with details and bring the image.
The final touch - character painting.
The final version of the character in color is accompanied by comments, which indicate the color values used for each individual element of the image in RGB or CMYK (depending on the software used in the project). The use of unconventional stylistics when imposing light and shadow on a character implies the additional development of a scheme of light-shadows.
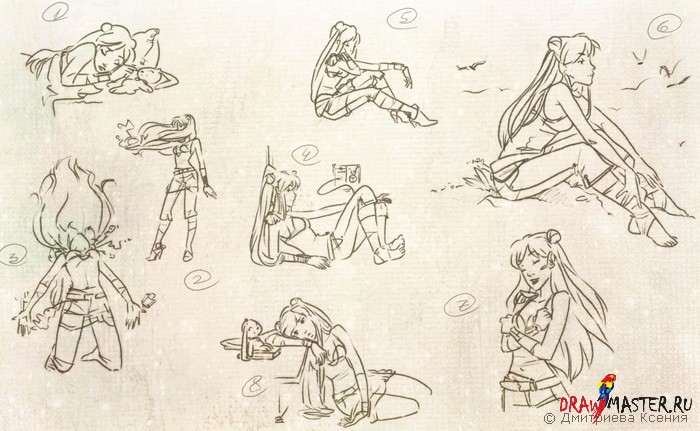
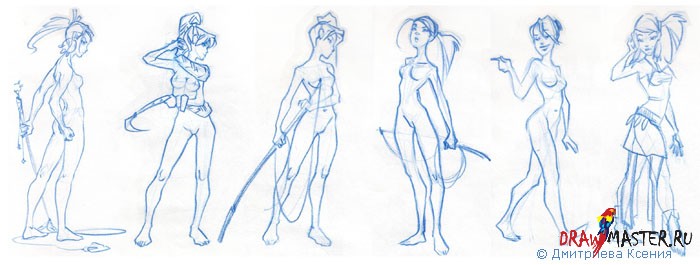
CHARACTERISTIC POSE OF CHARACTER
 Characteristic character poses complement the description of the literary image of the hero. They help to visually show the character of the hero, his habits and behavior. The key task of the artist is to convey the idea of the director as accurately as possible, endowing the hero with his qualities (according to the script).
Characteristic character poses are "Natural" (unconstrained), "Habitual" (reflex) and "Staged" (emotional):
- "Natural posture"- this is the calm state of the character in a standing position with support on one leg. Less often both legs are supported, with a uniformly distributed center of gravity.
- "Habitual poses"- characteristic of the hero's position of the body, taken reflexively in accordance with the mood of the character, for example: thoughtfulness, agitation, fatigue.
- "Posing poses"- deliberately exaggerated poses taken by the hero in the presence of a third person, for example: flirting, delight, surprise, shame.
Regardless of the type, the posture should be quite bright and expressive. The desired effect is achieved due to posture *, setting the arms and legs, head position, facial expressions and gestures.
Curious fact:
When creating characters, many artists involuntarily endow their heroes with a twisted medically posture. If we consider different types of posture according to F.Staffel, then the curvature of the spine is inherent in almost all types:
- "Flat concave"the back is characteristic of women. Such a bend of the back well emphasizes the female form in the waist and hips;
- "Flat back"peculiar to the military, when it is necessary to exaggerately show the bearing;
- "Round back"as a rule, belongs to a lanky, insecure young man or a tall, thin old man;
- "Concave-round back" possess monsters with a powerful torso.

Click on the picture to view the image in full size and 100% quality.
The position of the head, in combination with facial expressions and gestures, more expressively conveys the mood of the character. The head has five basic positions: straight, down, up, up, sideways, to the side.
The position of the character's head is directly related to the mood of the hero. For example: a raised head will emphasize confidence, arrogance, or daydreaming; Omitted - rage and aggression, fatigue or sadness; slightly lowered with a slant to the side - embarrassment and flirting, and in the straight position - surprise, fear or irritation. Despite a certain regularity, there are techniques that violate these principles, but this can already be considered an exception to the rule.
Unlike experienced artists who rely on their experience and intuition, novice artists will not be overly revered in special literature on the psychology of facial expressions and gestures, all the more this topic is quite interesting and helps the artist to identify certain patterns in human behavior independently.
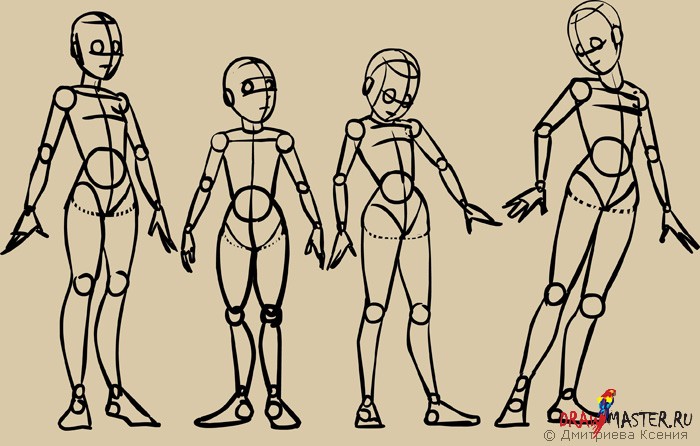
BUILDING A CHARACTER
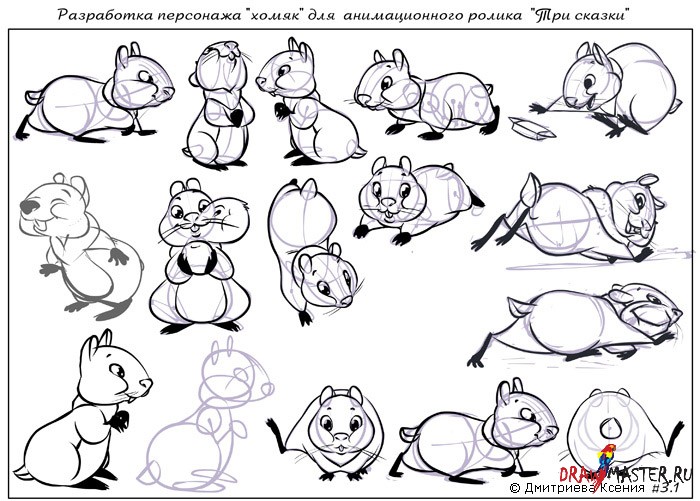
When creating an animated character, the artist must not only represent how the character will move, but also clearly explain this to the animator, who will later work with the character. To do this, the character understands the so-called "blanks", after which drawing character construction.
As we know, any complex object consists of simple shapes (circles, ovals, triangles, rectangles). The task of the artist is to disassemble his character in detail into simple forms, show ways to connect them on the centerlines and clarify the proportions. The character construction scheme should be simple, logical, convenient and understandable. The more intelligent the construction scheme is, the easier it will be to work with the character. It is worth noting that the technique of character creation for each artist is individual - some immediately build a character when it is created, others draw a character without building, focusing on their experience and intuition. Nevertheless, regardless of the character creation technique, it’s even necessary to disassemble it into "blanks", unless of course we are talking about a special animation style, where only the image is important, and the character construction does not play a big role.
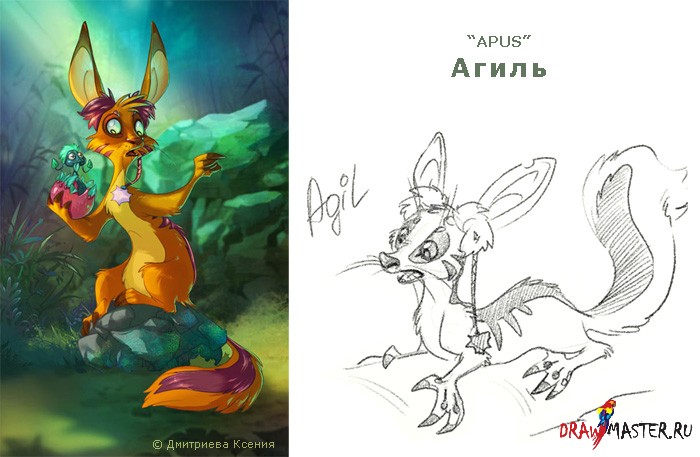
Something like this might look like a character
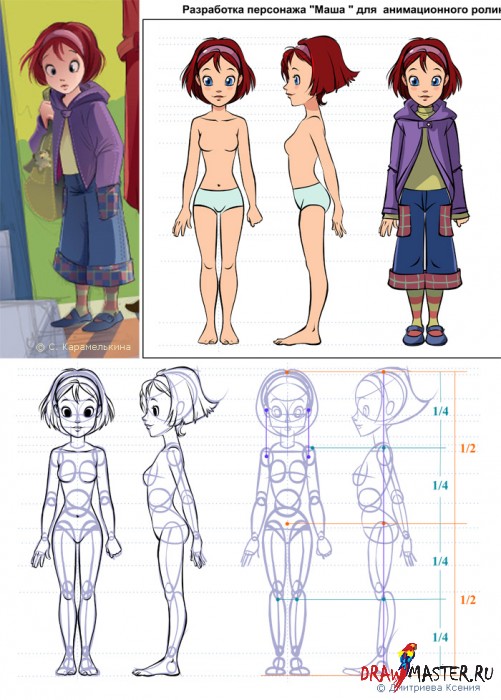
It is not rare that there is a need to adapt (adapt) a static character with an illustration for an animation project. To do this, it is enough to rebuild the character, breaking it into "blanks", at the same time simplifying small details.
An example of a static character adapted (adapted) to the animation.
Click on the picture to view the image in full size and 100% quality.
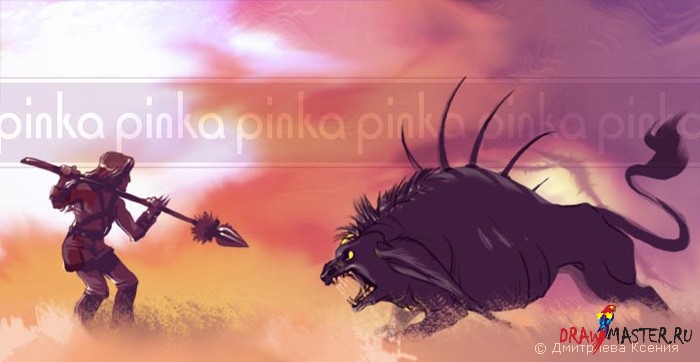
With animals, work happens in the same way as with humans.
EMOTION CHARACTER
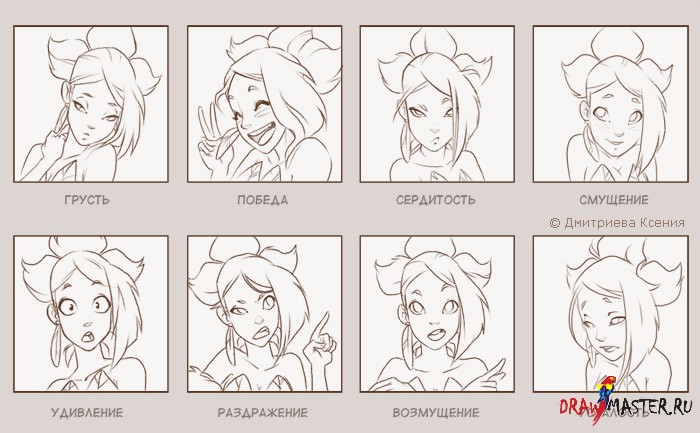
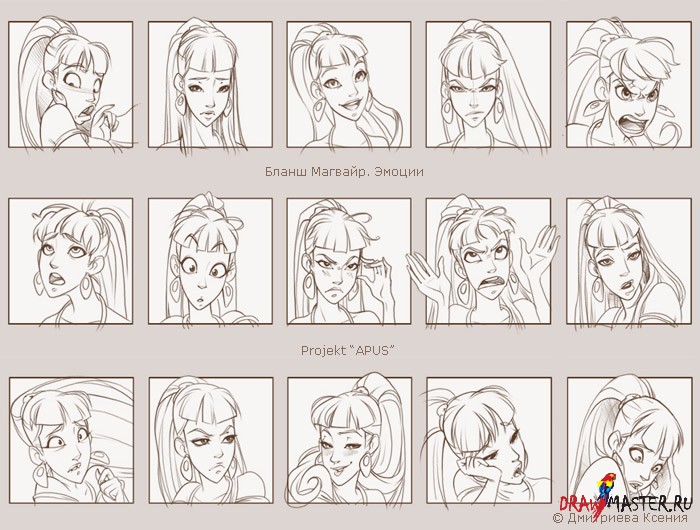
Any character should be able to express their emotions on current events.. The brighter and more diverse the facial expressions of the character, the more interesting you can beat his reaction to this or that event. The style of the character sets the framework in which emotions are created in an exaggerated form, the degree of which depends on the character’s "cartoon character".
Depending on the complexity of the project, the card of emotions can be very different. Specific emotions and their quantity required for a particular project is usually determined by the terms of reference.
REFINEMENT OF DETAILS
Accessories, clothing items and hairstyle of the character play an important role in creating a unique, memorable image. In the process of developing the details, it is important not only to visualize the idea of the location of additional elements in the character’s image, but also to clarify how these details “work”. The artist must understand the functional purpose of the elements invented by him, their practical application, interaction with the character, how they will move in the animation, in order to convey this visually in the character development documents.
To clarify the details are additional sheets.

COMPARISON TABLE
Comparative table of characters (ruler) is a lined sheet on which all the characters of the animated film are placed in such a way that with the help of comparative lines or a scale grid, you can clearly demonstrate the proportional relationship of characters (first of all, their growth).
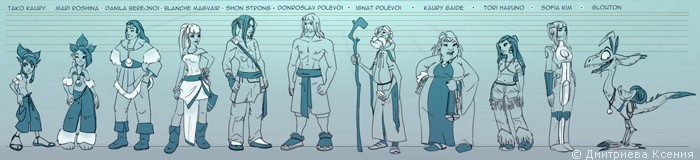
Episodic characters, as a rule, are not included in the comparative table. For them, a separate sheet is created, tied to the “ruler” using a scale grid. Or a comparison is made with the hero from the table (with which the episodic character interacts).
Related publications
-
 Five most famous volcanoes of the earth
Recently, volcanoes are increasingly appearing in the news reports and do not descend from the mouth of travelers. That's right, the consequences are ...
-
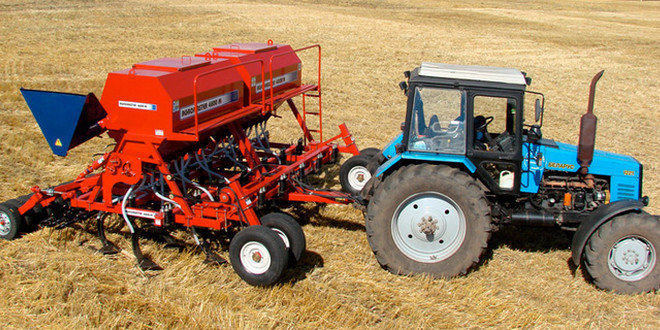 Description and modification of the tractor
(otherwise "Belarus") releases "MTZ-Holding". This is the second most popular model after the MTZ 80 series. A successful design, versatility ...