
Research work "Animation. Creating a cartoon." Principles of classical animation

Note.
Like most operations in Animate, no animation is required for ActionScript. However, if necessary, you can create animations with ActionScript.
Classic Animation - this is an old way to create animations in Animate. These animations look like new motion animations, but sometimes they are more difficult to create and they are less flexible. However, classic animation provides some control options that are not available for motion tweens. Most users will prefer to work with new motion animations, but some users will still use classic animation. For more information about the differences, see.
Getting Started:
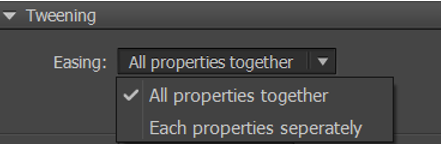
Before you start working with classic motion tweens, consider the following:
Classic animation is an old way of creating animation animations in Animate. A new, easier way is to use motion tweens. Cm. .
With the help of classic animation, you can not animate 3D properties.
Animated drop shadow. To access the example, download and unzip the Samples.zip file and go to the Graphics \\ AnimatedDropShadow folder.
Animation and gradients. To access the example, download and unzip the Samples.zip file and go to the Graphics \\ AnimationAndGradients folder.
Creating and editing keyframes for classic motion tweens
Changes in the classic animation are described in keyframe . In tween-animation, key frames are set in the main moments of the animation, and Animate creates the contents of frames between the key frames. Intermediate frames of tween-animation are highlighted in light blue or light green with an arrow drawn between frames. Since in Animate documents figures are saved in each keyframe, key frames should be created only at those animation points where something is changing.
Keyframes are indicated on the timeline as follows: a solid circle represents a keyframe with content, an empty circle in front of the frame is an empty keyframe. Subsequent frames added to one layer have the same content as the keyframe.
In classic animation, only key frames can be edited. Tween frames can be viewed, but they can not be edited directly. To edit tween frames, change one of the defining keyframes or add a new keyframe between the start and end frames. To add items to the current keyframe, drag items from the Library panel to the workspace.
To display and edit more than one frame at the same time, see "Using the mode of calculating".
Creation of key frames
Select a frame in the timeline and choose Insert\u003e Timeline\u003e Keyframe.
Click the frame in the Timeline with the right mouse button (Windows) or with the Control key pressed (Macintosh) and select the Insert Keyframe command.
Inserting frames in the timeline
To add a new frame, choose Insert\u003e Timeline\u003e Frame.
To add a new keyframe, choose Insert\u003e Timeline\u003e Keyframe by right-clicking (Windows) or Control-click (Macintosh), the frame in which the keyframe is placed, and select the command "Insert keyframe".
To add a new blank keyframe, choose Insert\u003e Timeline\u003e Keyframe, right-click (Windows) or Control-click (Macintosh), frame the keyframe into, and select command "Empty keyframe".
Deleting or modifying a frame or keyframe
To delete a frame, keyframe or sequence of frames, select them by right-clicking (Windows) or Control-click (Macintosh) and selecting Delete Frames. Neighboring frames remain unchanged.
To move a frame or sequence of frames together with the contents, select them and drag them to the desired position.
To increase the duration of the keyframe, drag it, holding down the "Alt" or "Option" key, to the end frame of the new sequence.
To copy and paste a frame or sequence of frames, select them and choose Edit\u003e Timeline\u003e Copy Frames. Select the frame or sequence of frames to replace, and choose Edit\u003e Timeline\u003e Insert Frames. To replace the exact number of copied frames in the target timeline, select the "Insert and overwrite frames" option.
To convert a keyframe to a simple frame, select the keyframe and choose Modify\u003e Timeline\u003e Clear Keyframe, or right-click the keyframe (Windows) or Control-click (Macintosh), and select command "Clear keyframe". The cleared keyframe and all frames, up to the next keyframe, will be replaced with the contents of the frame preceding the cleared frame.
To copy a keyframe or sequence of frames using drag and drop, select them and drag them to a new location by holding down Alt (Windows) or Option (Macintosh).
To change the length of a sequence of tween frames, drag the start or end frame to the left or right.
To add an item from the library to the current keyframe, drag an item from the Library panel to the Stage.
To invert the animation sequence, select the desired frames in one or more layers and choose Modify\u003e Timeline\u003e Invert Frames. At the beginning and end of the sequence, there should be key frames.
Adding a classic motion tween to an instance, group, or text
To animate changes to the properties of instances, groups, and types, you can use classic motion tweens. Animate can create an intermediate position, the size, rotation and tilt of instances, groups and font. In addition, Animate can create intermediate colors for instances and fonts, creating gradual color shifts or causing the instance to fade or appear gradually.
Before creating intermediate frames of group or font color, turn them into symbols. Before animate individual characters in a block of text, put each character in a separate text block.
If you apply a classic animation, and then change the number of frames between the two keyframes, or move the group or symbol to another keyframe, Animate again automatically creates intermediate frames.
Create a classic motion tween
Create a graphic object with the Pen tool, Oval tool, Rectangle tool, Pencil tool or Brush tool, and then convert it to a symbol.
Create an instance, group, or text block in the workspace.
Drag the symbol instance from the Library panel.
Move the item to a new position.
Change the size, rotation and slope of the element.
Change the color of the element (only the instance or text block). To create intermediate frames for the color of elements that are not instances or text blocks, use the form animation.
Click any frame in the animation frame range and choose Insert\u003e Classic Motion Animation.
In the frame of the animation frame, right-click any frame (Windows) or Control-click (Macintosh) and choose Create Classic Motion Picture from the shortcut menu.
To start the classic motion animation slowly and accelerate towards the final animation frame, enter a negative value between -1 and -100.
To start a classic motion tween quickly and slow down toward the final animation frame, enter a positive value between 1 and 100.
To perform a more complex speed change within the range of animation frames, click the Edit button next to the Slowdown field to open the User Deceleration and Acceleration dialog box.
By default, the rate of change between intermediate frames is constant. Acceleration gives a more natural form of acceleration or deceleration due to a gradual change in the rate of change.
To disable rotation, select "No" (the default setting).
To rotate an object once in the direction that requires the least movement, select "Auto".
To rotate the object as indicated, and then enter the number of turns, select "Clockwise" or "Counterclockwise".
Click the layer name to make it active, and select the empty key frame of the layer from which the animation should begin. This will be the first frame of the classic animation.
To add content to the first frame of the classic animation, do one of the following:
Note.
To create a motion tween, you need only one element on the layer.
Create a second keyframe on which the animation should end, and leave the new keyframe selected.
To edit an item in a final frame, do one of the following:
To create a classic animation, do one of the following:
If an image object was created in step 2, Animate automatically converts the object to a symbol and assigns it a name tween1.
If you resized the item in step 4, select Scale and the Animation section of the Property inspector to animate the resizing of the selected item.
To provide a more realistic sense of movement, apply a slowdown / acceleration to the classic motion tween. To apply a slowdown to classic animation, use the "Slow" field in the "Animation" section of the Property inspector to specify the deceleration value for each instance of the classic motion tween. In the "Custom slowdown and acceleration" dialog, you can more accurately control the speed of the classic motion tween.
Drag the value into the "Slow down" field or enter a value to adjust the rate of change between the intermediate frames.
To rotate the selected item during the animation, select the desired option in the "Rotation" menu of the property inspector.
Note.
The rotation in step 8 is added to any rotation that was applied to the final frame in step 4.
When using the motion path, select the "Path Orientation" option in the Property inspector to orient the baseline of the animated element with respect to the path of motion.
To synchronize the animation of graphic symbol instances with the main timeline, select the Sync option in the Property inspector.
Note.
As the "Modify"\u003e "Timeline"\u003e "Synchronize Symbols" command, the "Sync" parameter recalculates the number of frames in the motion tween so that the number corresponds to the number of frames selected in the timeline. Use the command "Synchronize" if the number of frames in the animation sequence within the symbol is not a multiple of the number of frames that a graphic instance occupies in the document.
When using the motion path, select "Snap" to attach the animated element to the path of the motion along the registration point.
Working with classic animation, saved as XML files
Animate allows you to work with classic animation in the form of XML-files. Own environment Animate allows you to use the following commands for any classic animation:
Copy motion as XML
Copy motion as XML
Allows you to copy the motion properties applied to any object in the specified frame in the work area.
Select the keyframe in the timeline.
Select Commands\u003e Copy Motion as XML.
Export motion as XML
Allows you to export the motion properties applied to any object in the workspace to an XML file that can be saved.
Create a classic animation.
Choose Commands\u003e Export Motion as XML.
Find a suitable location to save the file.
Specify a name for the XML file and click the "Save" button.
Import motion as XML
Allows you to import an existing XML file for which motion properties are defined.
Select an object in the work area.
Choose Commands\u003e Import Movement as XML.
Enter a location and select the XML file. Click OK.
In the "Special Motion Paste" dialog box, select the properties that you want to apply to the selected object.
Click OK.
Create a motion guide layer
To control the movement of objects when classic Motion Animations create a guiding layer.
You can not drag a layer from motion animation or layer with postures of inverse kinematics on the guide layer.
Drag the normal layer onto the guide layer. As a result, the guide layer will turn into a guiding layer of motion and connect the usual layer with a new guide layer of motion.
Note.
To avoid accidentally converting the guide layer, it is best to place all the guide layers at the bottom of the layer list.
Create a classic animation of the motion along the path
Leading layers allow you to draw paths along which you can animate instances, groups, and text blocks. To have multiple objects follow one path, you can bind several layers to the leading layer. A conventional layer, tied to the leading layer, becomes the slave layer.
In this example, two objects on separate layers are attached to the same contour of motion.
Create a motion path for a classic motion tween
To add a path for the classic motion animation to the motion guide layer, select the motion guide layer and draw the desired path using the Pen tool, Pencil tool, Line tool, Circle tool, Rectangle tool, or Brush tool.
You can also insert a path into the motion guide layer.
Drag the animated object to snap it to the beginning of the line in the first frame and to the end of the line in the last frame.

An image of the car tied to the beginning of the steering path.
Note.
To achieve better binding results, drag the symbol to its conversion point.
To hide the guide layer and the path so that only the movement of the object is visible during operation, click the column with the eye icon on the leading layer.
When playing an animation, a group or symbol follows along the path.
Create a sequence of classic motion tweens.
When you select the "Orient by contour" option in the Property inspector, the baseline of the intermediate elements is oriented along the path of motion. When you select the "Snap" option, the registration point of the intermediate element is linked to the motion path.
Click the name of the layer containing the classic motion tween, right-click (Windows) or Control-click (Macintosh), and click Add Classic Animation Guide.
Animate adds a motion control layer above the classic motion animation layer and indents the name of the classic motion animation layer to show that it is tied to the motion guide layer.
Note.
If the timeline already has a guide layer, you can drag the layer with the classic motion animation under the guide layer to turn it into a motion guide and tie it to the classic motion tween.
![]()
A layer of the motion guide above the layer, containing the classic motion tween.
Bind the layers to the leading layer
Drag an existing layer under the master layer. The layer under the leading layer is indented. All objects on this layer are automatically tied to the path.
Create a new layer under the top layer. The objects on this layer, for which tween-animation is applied, automatically move along the contour of the motion.
Select the layer below the lead layer. Select Modify\u003e Timeline\u003e Layer Properties, and select Guideline.
Perform one of the following actions.
Separating layers from the master layer
Drag the layer to the position above the master layer.
Select Modify\u003e Timeline\u003e Layer Options, and select Normal for the layer type.
Select the layer to unlink and do one of the following:
Insert properties of classic motion tweens
The "Insert Motion" command allows you to copy a classic animation and insert only certain properties that need to be applied to another object.
On the timeline, select the frames that contain the classic animation you want to copy. The selected frames should be on the same layer, but they do not have to cover one classic animation. The selected area can span tween-animation, empty frames, or two or more tween-animations.
Choose Edit\u003e Timeline\u003e Copy Motion.
Select an instance of the character that gets the classic copy animation to be copied.
Choose Edit\u003e Timeline\u003e Insert Special Motion. Select the special properties of the classic motion tween that you want to add to the symbol instance. There are the following properties of the classic motion tween.
X-Position
Shift of the object along the X axis.
Y Position
Shift of the object along the Y axis.
Horizontal Scale
The ratio between the current size of the object and its actual horizontal dimension (X).
Vertical Scale
Indicates the relationship between the current size of the object and its actual vertical dimension (Y).
Rotate and tilt
Rotate and tilt the object These properties must be applied to the object at the same time. Inclination is a measure of rotation in degrees, so when you rotate and tilt simultaneously, each of these properties affects the other.
Color
All the color values, such as hue, brightness and alpha channel are applied to the object.
Filters
All values and filter changes for the selected range. If filters are applied to an object, the filter is added with unchanged values and its state (on or off) also applies to the new object.
Overlay mode
Applies the blend mode of the object.
Change the final properties of the scale
If the property is not set, then it indicates that all properties are added relative to the target object. If set, this option overwrites the scale properties of the target.
Change the final properties of rotation and tilt
If the property is not set, then it indicates that all properties are added relative to the target object. If set, the properties added overwrite the existing rotation and tilt properties of the object.
Required frames, tween-animation and information about the characters are added to match the original copied tween-animation.
To copy the classic symbol animation to the Actions panel or use it in another project as ActionScript, use the Copy Motion As ActionScript 3.0 command.
Creating Sets of Slowing Settings
Sets of settings for deceleration are pre-configured decelerations that can be applied to objects in the work area.
For classic motion tweens, there are several common sets of deceleration settings available. You can select a set of settings from the list and apply it to the selected property.
If you are using the HTML5 Canvas document type, you can optimize the output file js for the deceleration settings sets. When you create output, HTML5 Canvas uses slower JS animation functions.
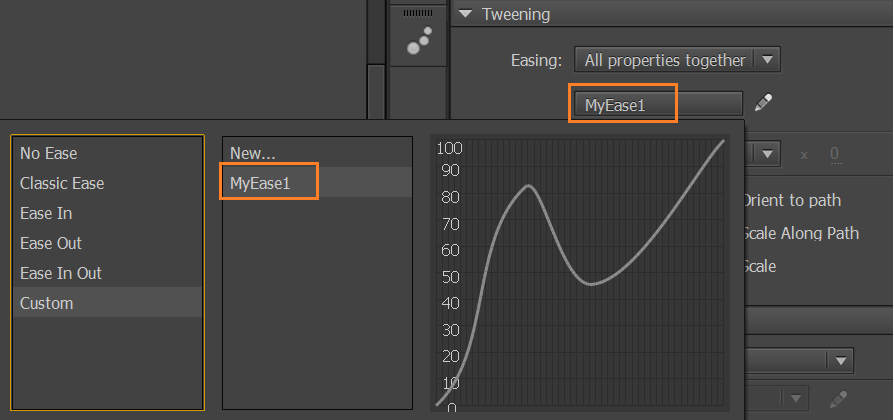
Using custom acceleration / deceleration to classic motion tweens
The Custom Acceleration / Acceleration dialog box displays a diagram in which a graphical representation of the speed of movement in time is given. The horizontal axis shows the frames, and the vertical axis shows the percentage of changes. The first keyframe is represented as 0%, and the last keyframe is represented as 100%.
The slope of the curve graph shows the rate of change of the object. If the curve is horizontal (without inclination), then the velocity is zero; if the curve is vertical, then the change occurs instantaneously.
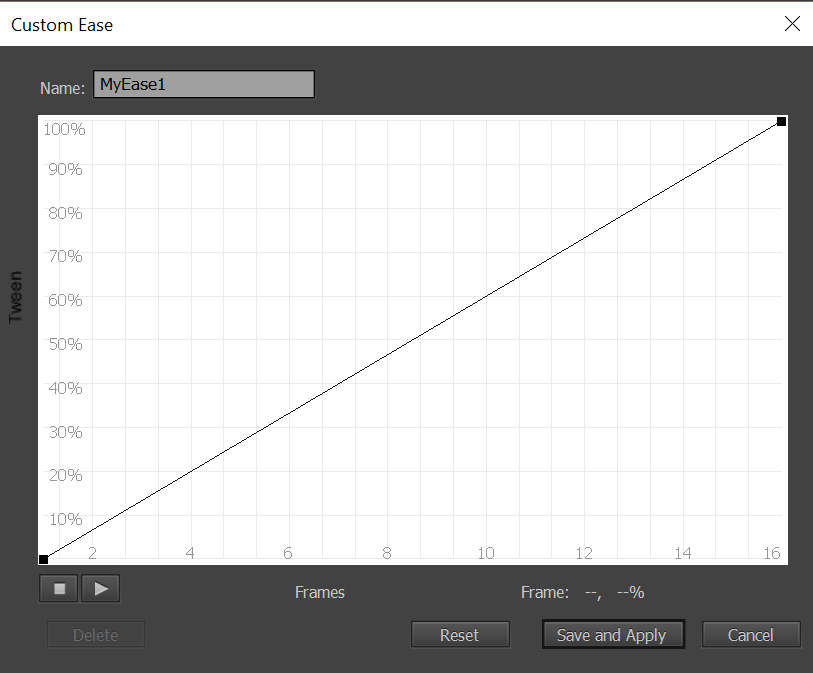
The diagram "Custom deceleration / acceleration", which displays a constant speed. Open this dialog box by selecting a frame in the classic motion tween and clicking the "Edit" button in the "Slow down" section in the Property inspector.
Saving a User Deceleration
You can save the custom deceleration by clicking the appropriate button, and then use it by selecting in the user list. Click the "Save and apply" button in the edit mode after making changes. In the next screenshot, the custom set of deceleration settings is displayed under the name MyEase1.
Sergey Gashnikov
Seeing many three-dimensional characters, you catch yourself thinking that these are soulless mechanical puppets, so they differ from the living heroes of the animated films. Nevertheless, it is not difficult to turn a three-dimensional model into an animate being. It is enough to get acquainted with the 12 Disney principles and apply them in their works. Although these principles are written by multipliers and for multipliers, they are easily adapted to a three-dimensional chart.
The Disney principles were obtained in a practical way, based on the daily experience of the masters. They were so successfully written and the result of their application was so effective that the principles became an obligatory subject of study first for the animators of the Disney studio, and then for the multipliers of the whole world.
compression and stretching,
preparation, or pre-emption,
scenic,
drawing "straight ahead" and drawing "from the posture to the pose",
through movement and overlap,
slow entry and exit,
secondary actions,
timing, or timing,
exaggeration,
"strong" (professional) drawing,
attractiveness.
To everyone who continues reading this article, I'll try to talk about all these principles and how they can be used in 3D.
Principle 1. Compression and stretching
The first principle of animation is both very simple and very important. It is fundamental. With its help you can easily "revive" the character, create the illusion of naturalness of movement on the screen. It is based on the fact that any living body (and many inanimate objects) with motion is constantly compressed, then stretched.
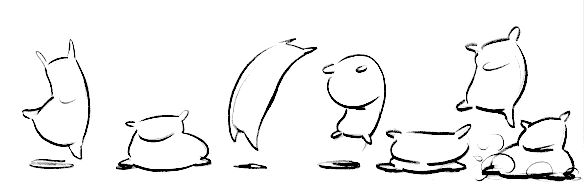
This principle is easily explained on the example of a jumping ball. Look at Figure 1. Notice how the ball shrinks at the bottom of each arc at the moment of the collision with the surface. The next moment (at the time of the rebound), the ball is stretched. These compressions and stretches make the movement natural, believable. They explain to the experienced human eye the reason the ball is jumping.
The same manipulations can be made with other simple figures (Fig. 2).
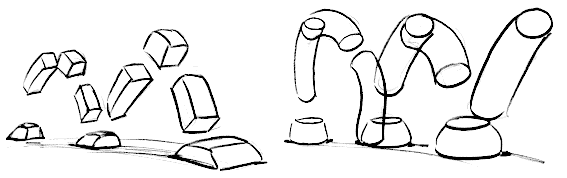
Similarly, you need to animate characters (Fig. 3). All the difference in more complex forms.
When using this method, it is necessary to follow one rule - the object's volume should remain constant. Vertical stretching should be compensated by horizontal flattening, and vice versa. Multipliers give a successful example with a bag of flour, - with any throw, it changes shape, but the amount of flour in it remains the same. Perhaps that's why multipliers like to draw and practice on the classic "flour bag". (Fig. 4)
This method can and should be used in 3D scenes. To ensure that your characters do not seem to be mechanical puppets, petrified statues; so that the viewer believed in what was happening on the screen, began to empathize with your heroes.
Here is an example using this principle (Fig. 5). Two characters jump from the stand to the ground. One character is a robot, which is a solid body, and the second character is elastic and alive - a mouse. The compression-stretching principle works for both characters. But for the robot, compression-stretching is almost imperceptible, because the metal spindle and can not be compressed. A mouse jump is a classic Disney principle of compression-stretching. The muscles and fat that make up this character are very elastic and easily change shape.
Feel free to use this method in your scenes, small compression-stretching will give naturalness to your heroes. If you increase the compression-stretching, then you can give the characters a more cartoony look. Changing the degree of compression-stretching can show the elasticity of the object, change the mood of the scene and much more. Try and experiment!
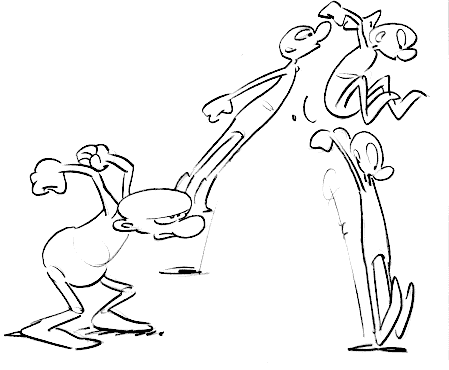
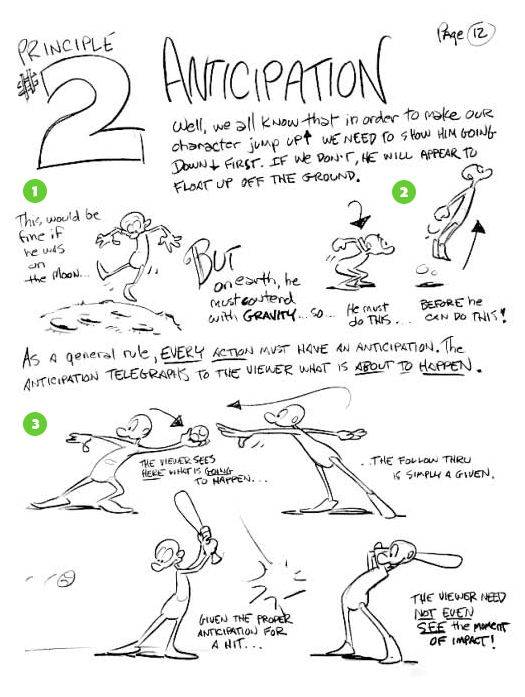
Principle 2. Preparation, or anticipation
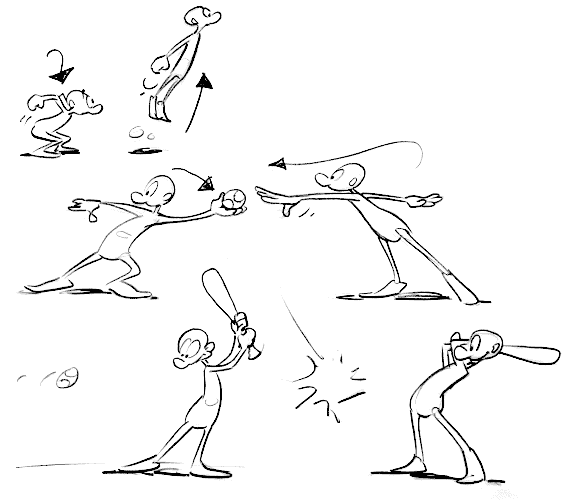
You certainly know that before the character jumps, he must sit down. Probably, on the Moon it is superfluous, but on the Earth it is necessary to struggle with gravitation. Therefore, in the beginning the character should sit down, and only then jump up. As a rule, each action is preceded by Preparation. Exactly Preemptive informs the viewer what is about to happen. The viewer looks at the character who is waving and understands that in a moment there will be a throw of the ball. It's enough to show the anticipation of a bat hit the ball, and the viewer can already not show the moment of impact. (Fig. 6).
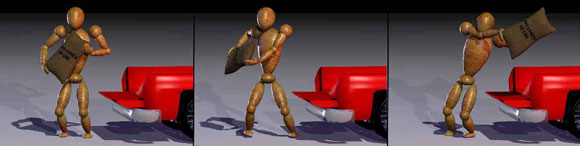
Look at the example of using this principle in 3D (Figure 7). To throw a heavy bag into the car, a person at first deviates in the opposite direction, and only then throws.
The same principle should be used when animating the hands, feet, heads of characters. For example, to turn your head to the side, you must first slightly move it to the opposite side (Fig. 8).
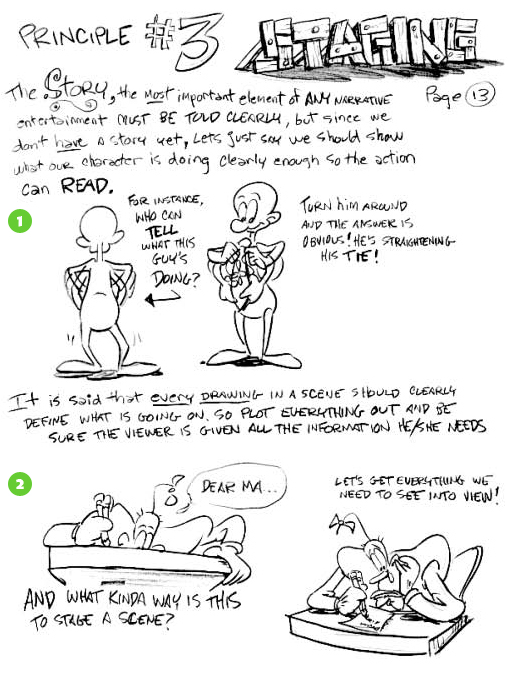
Principle 3. Scenery
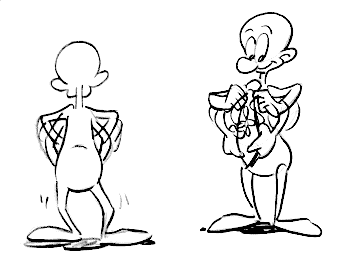
In any story, the story and the way it is shown are important. The action on the screen is designed for the viewer, and everything that happens must be extremely clear, understandable and recognizable. For example, what does the guy on the left do? Not quite clear. But it's worth it to deploy, as the answer becomes obvious. He ties up his tie (Fig. 9).
The facial expression is scenic, if it is well readable, the character's mood is scenic, if it affects the viewer. The nature of the character must be recognizable, the details clearly visible, the replicas legible, the text lucid, etc. The character's movement should not be concealed by clothing, or be smeared with an incorrect choice of the angle of view, or marginalized by something else.
It's in 2D ... And what about 3D? All the same. This means that each frame should clearly describe what is happening on it. Make a test render and make sure that the viewer gets all the information he needs. Make sure that the view from the camera is selected correctly, that the background does not divert attention from the main action, the characters are well readable, and their actions are understandable. And only after that continue.
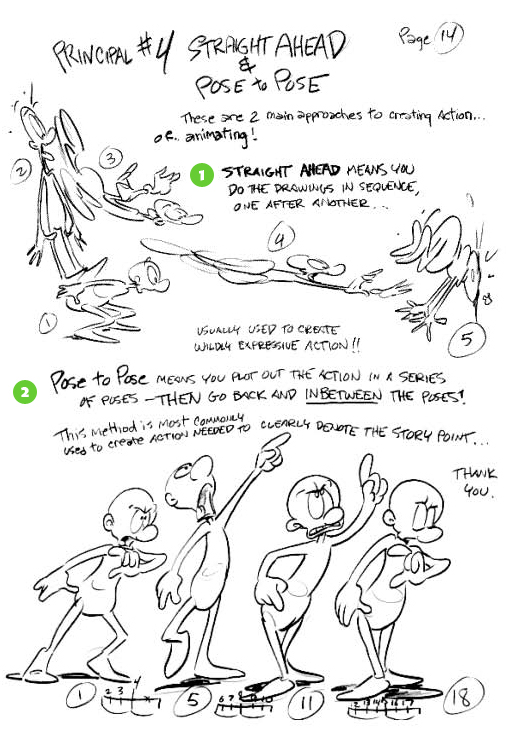
Principle 4. Drawing "straight ahead" and drawing "from the posture to the pose"
There are two approaches to creating animation - straight ahead and from posture to posture.
Drawing "straight ahead" means that you are drawing a frame by frame. This method is usually used when creating very active (fast) scenes. (Fig. 10)
Drawing "from posture to pose" assumes that you draw key poses (phases) for the entire scene, and then you come back and draw the shots between these poses. This method is the most common in animation. (Figure 11)
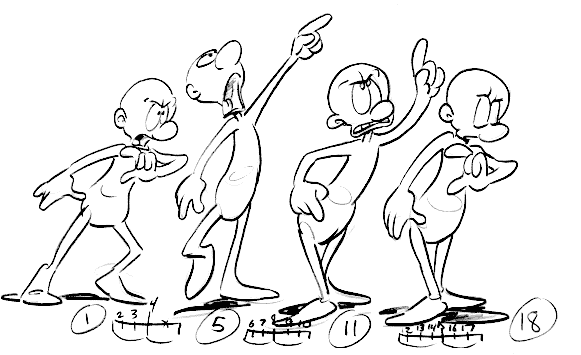
This method is 100% familiar to everyone working in 3D. Drawing "from posture to pose" is a classic work with key frames. But in very fast scenes, I would recommend using the "straight ahead" method to get an improvisational animation with an element of surprise and novelty.
A year ago I already took a note on the blog about. In fact, I duplicate the information, but I'm sure there is not much theory about animation. And what could be better than the theory, supported by a large number of illustrations, when there are few beeches and many pictures :)
A source - E-Book - How To Draw - Comics and Cartoons, Basic Drawing. Download a book in full volume it is possible under the link.
I wanted to lay out without translation - at first glance, it seemed to me that the illustrations are very clear and understandable. But then I decided to take a little time and do at least some, but the translation, after all, it's not easy for everyone to read hand-written English. I had to pay more time than I had originally planned, but I do not like to throw halfway up, I had to assemble myself and finish off :) In addition to the 12 principles, it also contains other useful information in the animator's box, so you should at least glance through it with a mouse. So - 12 principles of animation in the illustrations.
1. Squash and Stretch (Compression and stretching)
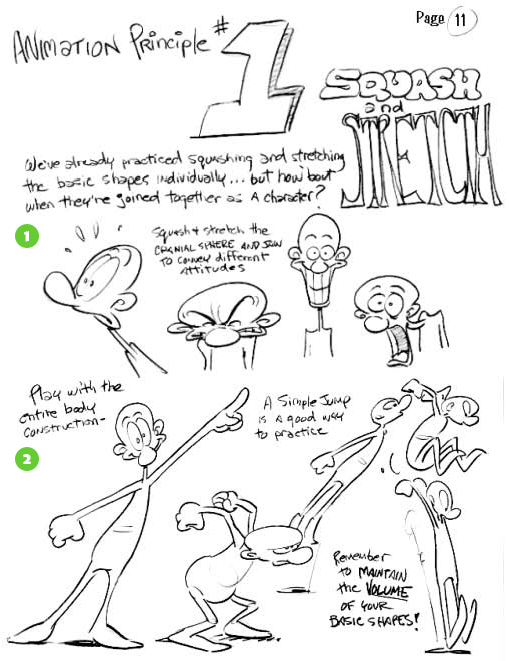
The pages of this book earlier show how to compress and stretch the main forms (circle, square other). How does this apply to the character?
2) Play with the body shape, the usual jump is very good for the animation practice. But do not forget to keep the volume of the body - lengthening the character, at the same time narrow it.
2. Preparation or Anticipation (Preparationoranticipation)
We all know that before jumping, you must first sit down. If this is not done, there will be a feeling that we are hovering over the zamlej. Such a layout is very good, if we are on the moon (1), but on the ground we are struggling with gravity and before doing this (jump, meaning :), it is necessary to sit down (2).
The main rule (3) - EACH movement in the animation has preparatory movements, because before doing something, the character, as it were, refuses the action, doing the opposite (for example, before hitting the ball with the bat, you need to take your hand back). Pre-emption prepares the viewer for what will happen now.
3. Staging(Scenery)
The story should be given to the viewer as clear and comprehensible as possible. The character's action should READ in any position.
1) What does the little man, turned to us with his back, do? The puzzle ..
Put him to us forward, and back to the forest - and now everything is clear: he ties up his tie :)
In short, everything that is in the field of our vision on the stage must be understandable to the viewer. We must be sure that the viewer will receive the maximum information from what he has seen, and nothing should hide from his sight.
2) Does a person do something at the table? He writes a letter to his mother (we show it in a different perspective, more understandable).
4 . Arrangements (Pose to Pose) and phase movement (Straight Ahead Action)
There are 2 ways of animation:
1) The first method is the Straight Ahead Action, when we immediately draw motion one by one as it goes.
2) And the second way (Pose to Pose) - first draws layout (basic posture), and then in-betweens (intermediate frames). This method is considered more convenient (there is another word, but I can not consider it :)
5. Through-going, or follow-up, and Overlapping Action
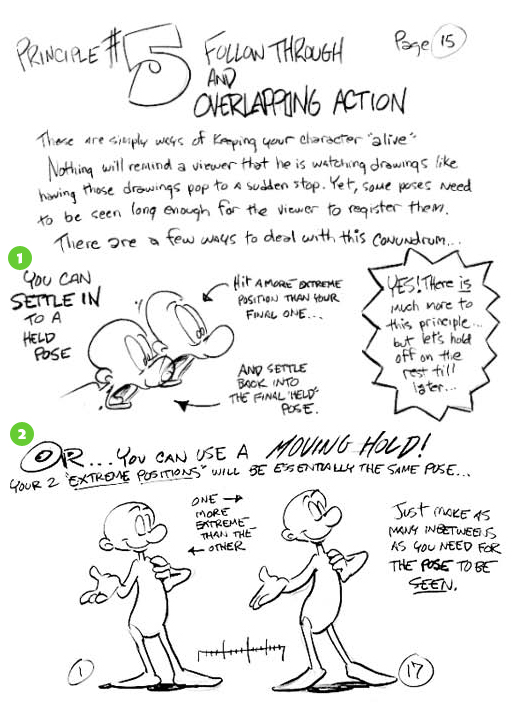
There are a few simple ways to animate a character. The character should not stop and freeze. Yes, some postures should be static for some time so that the viewer can view them well. There are several ways to solve this problem.
1) Make the extreme position more extreme and go to the ordinary (the person seems to be entering, and then he returns to the normal end position)
2) You can also use move and hold (moving hold). To do this, make the 2 final key positions very similar, but, unlike the first option, make the transition from the less extreme to the more (in the figure a man with a hand). And then animate the smooth transition from one to the other, using the maximum number of intermediate frames so that the states of the character (poses) are readable.
6. Slow In & Slow Out (Slow Input and Slow Output)
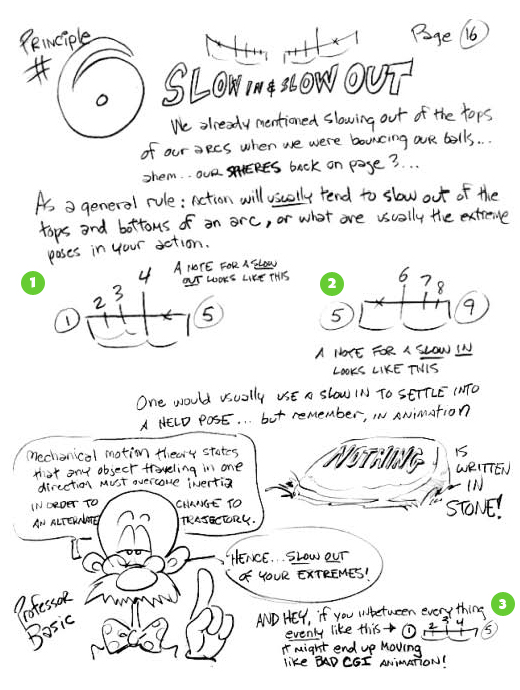
Previously, it was said that the movements should slow down at the highest points of the curve (arcs), when, for example, the ball jumps. The main rule: the motion is always slowed in the upper and lower points of the arc, where, as a rule, there are key frames (points) of the action. 1 - 2 - slow entry and exit.
The essence of the method is that the movement is calculated in such a way that the main part is necessary to demonstrate the layouts.
A good animation schematically looks like this (1 -2), and the bad way is (3) .
7. Secondary Action(Additional action, or expressive detail)
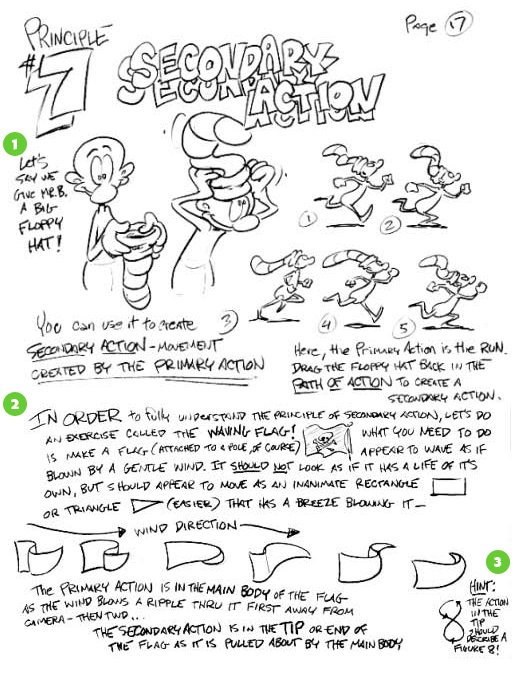
1) Give Mr. Bee a large, loose hanging cap. We use it to create an additional movement - a movement created on the basis of the main (in this case the main animation is the running cycle).
3) The chip - the animation cycle of the flag movement describes the figure eight.
The result is that additional actions always follow the main one.
8. Timing
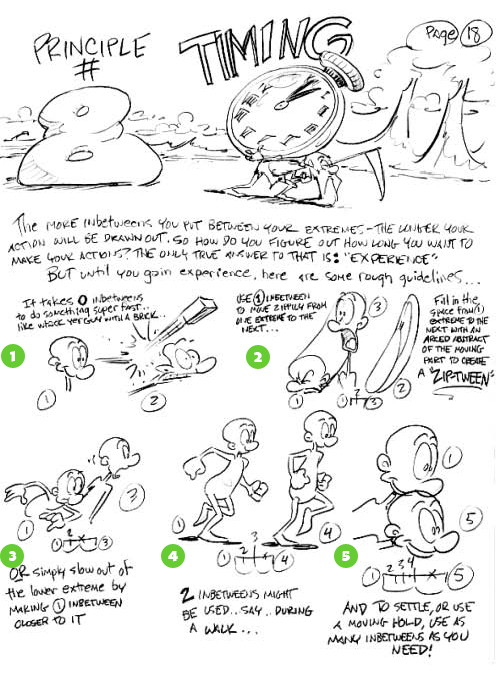
The correct calculation of time is the key moment for perception of images. It is important to set enough time to prepare the viewer for the expectation of the action, the action itself and reaction to the action.
1) 0 intermediate frames (for very fast movement, such as attacking a character with a brick).
2) 1 intermediate frame for fast movement from one key position to another.
3) Also 1 intermediate frame to exit from one key position and go to the next one, close to it.
4) 2 intermediate frames - in the cycle of gait between the key frames.
5) Smooth stop - the number of intermediate frames is maximum.
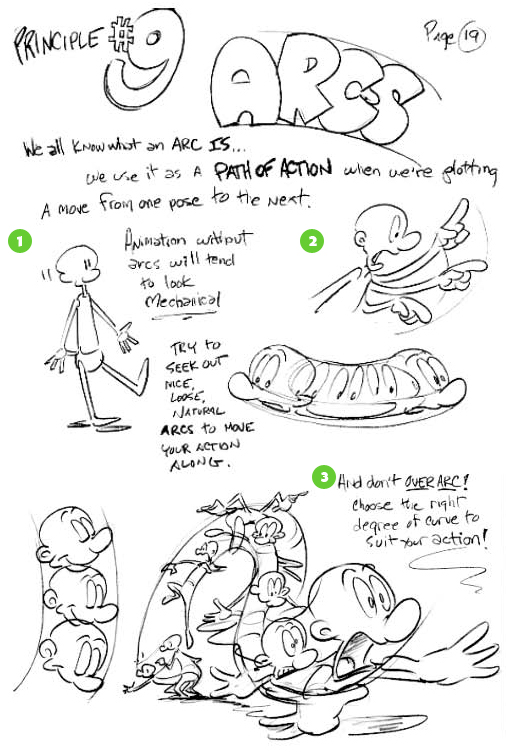
9. Arcs(Arcs)
Arcs are used as a trajectory from one position to another (2). Animation without the use of arches looks mechanical (1). Never go beyond the boundaries of arcs! Choose an appropriate angle for the curve to make the movement the most faithful (3).
10. Exaggeration (exaggeration, exaggeration)
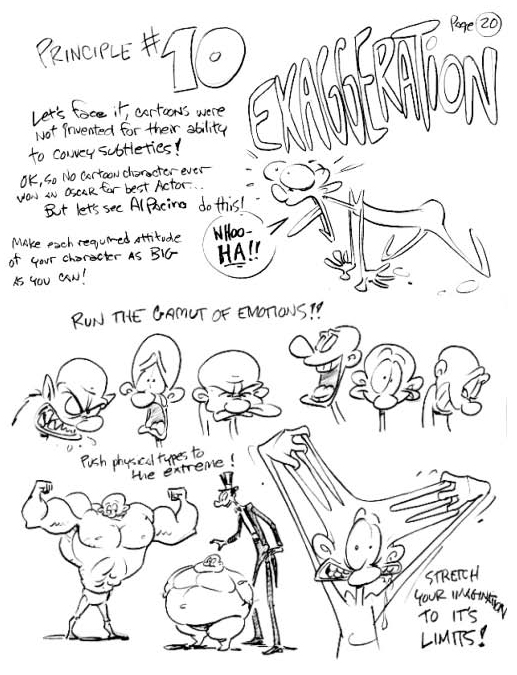
Make each desired position of the character maximum, that is, if it's emotions - it's just tearing the soul, if the gait, the look - then the most pronounced and spectacular. It is important to exaggerate all actions, so we emphasize the main features of the character
11. Solid Drawing (Professional drawing skills)

Oh, how much text is scrawl :) Judging by the picture, you need to draw until your eyes burst.
Each time, working on an animation character, build it out of the basic forms. If everything is done correctly, the character will look bulky, not flat.
Each character for the classic animation is built according to a certain formula, when it can be disassembled.
The higher your skills in the drawing - the more you are suitable for the profession of the animator.
12. Appeal (Attractiveness)
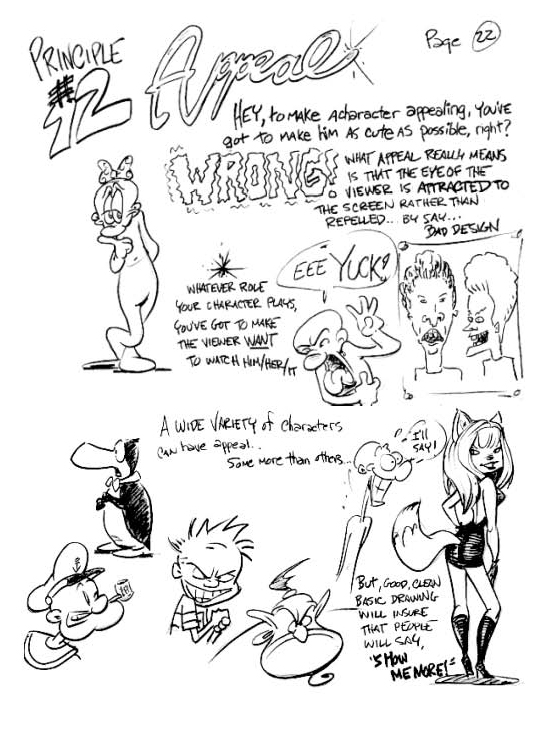
Make an attractive character does not mean making him a nurse-cutie. In fact, the stage appeal means that the character attracts the viewer's attention, rivet the eye. Regardless of what role the character will play, you can make it so that the viewer does not take his eyes off him and wants to watch more and more. Even an ugly and terrible villain should be sympathetic.
A source – E-Book - How To Draw - Comics and Cartoons, Basic Drawing
Regional scientific-practical conference of research, design and creative works of students "The first steps in science"
Research
ANIMATION.
Creating a cartoon
Lazareva Renata,
second-grade student
IBSU "Insar School № 2"
Leader:
Tambovtseva Natalia Ivanovna,
primary school teacher
IBSU "Insar School № 2"
Insar 2016
Information page
"Insara Secondary School № 2"
Head teacher: Shchegoleva Tatyana Viktorovna
A school address:
ul. Sovetskaya, 55
School Phone: 2-10-05, 2-11-93
431430, Republic of Mordovia, Insar town,
Trans. Factory, 2, apt.11
Phone: 89513427256, 89271717831
Head of work: Tambovtseva Natalia Ivanovna,
primary school teacher.
CONTENT
Introduction .................................................................. 4
History of animation ................................................ 6
Technologies for creating cartoons ................................. 9
Kinds of cartoons ........................................ ............. eleven
Practical part. Questioning .................................... 13
Practical part. Creating your own cartoon ...... .. 14
Conclusion .................................................................. 15
Literature .................. .. ................................................ 16
Application…………………………………………………………. 17th
Introduction.
Cartoons are fun for the whole day!
Cartoons are funny stories!
Cartoons are ... great!
Cartoons are a wonderful and amazing fantasy world that comes to life on the screen. Painted and puppet characters behave as alive: they are happy, sad, act. Incredible miracles take place with them.Perhaps there is no child in the world who would not like cartoons. I also love them very much.The number of animated cartoons I have already not counted, and it seemed that I know a lot about them. But one day I thought: what is a cartoon? How is it created? I myself could not answer this question myself.I asked my classmates, but they also found it difficult to answer. I found out that all the guys in our class really like to watch cartoons (from 15 minutes to 1.5 hours daily). However, not everyone knows what a cartoon is, and with difficulty give an explanation. For research, I went to the library.
The word "cartoon" has different meanings, based on various forms of visual art and illustration.In the explanatory dictionary I read that cartoons, "cartoon, animated film, animation"a kind of cinematography, whose works are created by shooting successive phases of the movement of drawn (graphic or drawn animation) or volumetric (volume or puppet animation) objects. This is how animation is called in our cinema, which means "soul", "animation" or "animation" in Latin. For myself, I determined: a cartoon is an animated picture. And then the question arose: How can I enliven the picture? How can this be done? Is it easy or difficult? I wanted to find answers to these questions, so I decided to conduct my own research.
The purpose of my research: creating my own cartoon
Hypothesisresearch: I suggested that making a cartoon is easy: once and ready.
To achieve the goal, I had to solve the following tasks:
Conduct a survey among classmates.
To study the history of the development of animation.
Discover the main technologies for creating cartoons.
Learn the ways to create a personal cartoon.
Research problem:Research of animation: from simple to complex.
Object of study: animation as a special kind of cinema art.
Subject of study: the history of animation, ways and technologies for creating simple moving pictures, the process of creating an animated film.
In my work, I used the following methods:
Study of literature.
Viewing video.
Study and analysis of the simplest animation technologies.
Shooting your own cartoon.
Analysis of the result.
First I compiled a study plan:
Learn all about the cartoons.
Learn the technology of creating cartoons.
Try some of the technology to create cartoons.
Create your own cartoons, using the experience gained.
The story of animation.
Artists of all times and peoples dreamed of the opportunity to convey in their works the true movement of life. The desire of mankind to capture in the figure the movement observed in nature and life, we find in the monuments of ancient times. Back in the 70s BC. Roman poet and philosopher Lucretius described the device for flashing on the screen moving pictures. And in XV at. There were books with drawings that reproduced the various phases of the movement of the human figure. Collapsed into a roll, and then instantly unfolding, these books created the illusion of animated drawings. In the Middle Ages there were also craftsmen who entertained the public by sessions of moving pictures using optical devices like filmoscopes, where transparent plates with drawings were inserted. Such devices were called a magic lamp. FROMXVII In the wandering theaters throughout Europe, such presentations were held.
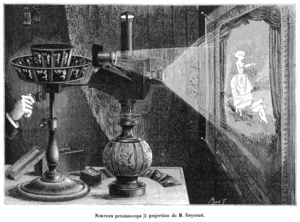
Attempts to find ways to revitalize the drawings through special devices continued. it is considered the birthday of the drawn animation. In France, the self-taught engineer Emile Renault showed the first ("Optical theater").
The first cartoons were painted and hand-painted images lasting about fifteen minutes. Even then, sound was used. Later, other multipliers contributed to the development of the animation, creating pictures in various genres and techniques.
The recording of the first Russian cartoon was made in 1906 by the ballet master of the Mariinsky Theater AlexanderViktorovich Shiryaev.The cartoon depicted 12 dancing figures against the background of motionless scenery. The record was discovered only in 2009.Alexander Viktorovich, applied puppetry, drawing, and also combined techniques. He arranged a shooting pavilion in the room and a special box on the mini stage, imitating the theatrical scenes in several tiers with electric lighting from the inside, creating animated ballet films. His goal was not to create a new art, but an attempt to recreate the human movement, recreate the choreography.
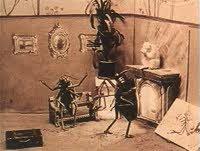
For many years, Vladislav Alexandrovich Starevich, a biologist by education, was considered the father of puppet art. He made his film only in 1910.This cartoon was about beetles and was not at all like what we used to see. It was withdrawn for educational purposes: the first Russian animator was not going to entertain little viewers, he wanted to create a documentary about beetles. However, during the filming of the scientist faced with a problem - when installing the right light, the beetles refused to move. Then Vladislav Starevich made beetles out of beetles, attached strings to them, and filmed the film in frames. This painting was called the first puppet cartoon. Starevich performed several more similar cartoons on insects, but now he used the real scenarios. These cartoons were very popular with the audience - many did not understand how the pictures were made and were surprised at how the author managed to make the beetles so trained.
These animations appeared several years later. The first cartoon with sound - "Mail" - is based on the works of Samuel Marshak in 1930. The author of the script was himself Marshak. Soviet color multipliers started working in the late 30's. Already the first experiments ended successfully - on the screens of the country appeared such colored ribbons as "Sweet Pie" (1936), "Little Red Riding Hood" (1937) and "Little Muck" (1939).
AT founded film studio " ". The main task that was put before her is the service of the children's and young people's viewers.
Artists of the animated film began to master the traditions of our literature, folklore and fine arts. They turn to Russian, foreign classical and folk tales. Characters in pictures lived their lives and had not only their special appearance and habits, but also their character. Witty plot situations, inventively found details, a diverse environment in which the action took place, clear, intelligible text, beautiful music of the composers - all this forced the viewer with unflagging attention to watch cartoons from the first to the last frame. This, for example,
"Baby and Carlson", "Well, wait!", "Crocodile Gena and Cheburashka", "Bremen musicians", "Adventures of Winnie the Pooh", "Three from Prostokvashino", "Kitten named Gav" and many others.
Thus, domestic animation has created a strong position on the international film market, it began to be talked about, it began to be written abroad.In the post-war period, Soviet animation not only recovered quickly, but also continued to flourish. At this time, domestic cartoons began to slowly but surely enter the world's animation arena. The most notable tapes of that period are "Sinbad-sailor", "Missing charters", "Spring melodies" and "Humpbacked Horse". Years passed, times changed, technology stepped far ahead, new opportunities arose. In place of dumb black and white frames came color, sound, computer animation.
Technologies for creating cartoons.
The most common technology for creating cartoons -animation. Animation is a magic technology that forces inanimate objects to move. For animation, the main thing is to create actions and effects that are impossible in real life. Only in this fantastic world can you fly, change your appearance, recreate yourself. The animation of objects looks magical. It's amazing how small grains of sand themselves can form into a sand castle or a pencil, unexpectedly without anybody's influence, starts to display on the paper bizarre images.
But first Istudied ways to revive the picture.The simplest and longest way, it turned out - to draw on the corner of each leaf in the notebook changing the movement of the figure, and then quickly scroll through the pages. And the pictures come to life.
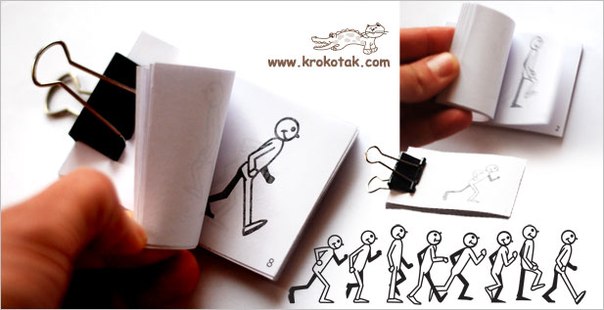
There used to be such a devicecineographer( Kineograph ) - consisting of sheets , stitched in a notebook. The viewer, turning over in a special way a notebook, observes the effect of animation. Cineography is one of the forms .
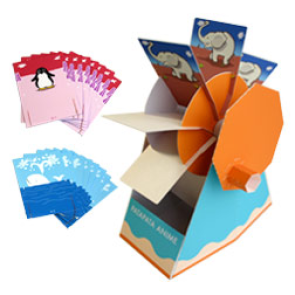
Still you can make a mill-movie camera. First prepare a pattern and glue. Blades of the mill - pictures with phases of motion. When you rotate the knob and the mill turns, you get a real movie.
After trying all the above methods, I decided to move on to more modern methods of shooting. But for this I lacked knowledge about the technologies for creating animation.
Kinds of cartoons.
On the Internet, I found out, what are the cartoons.
On the technological process:
Sand animation -in it, a light powder (sifted sand, salt, coffee) is applied in thin layers on the glass and mixed, creating a moving picture (usually all actions are performed by hands, but brushes can be used as adaptations).
Plasticine animation - one of the oldest animation techniques. In this genre worked such animators as Alexander Tatarsky ("Plasticine crow", "Last year's snow fell"). One of the most tempting sides in its creation is the magnificent unique properties and possibilities of plasticine. Creating such a cartoon is exciting, interesting, but requiring diligence and will work.
Puppet animation is a method of volumetric animation. When you create, you use the scene-layout and puppet-actors.The doll is photographed in front of the camera in the desired position. And to create the effect of the movement of its position each time a little change. Great creative success was achieved by the Soviet puppet animation. Talented director and artist AL Ptushko produces two full-length puppet films "New Gulliver" and "Golden Key", which have been successfully performed not only in our country, but also abroad. Now puppet animation is very popular.
Drawing animation - animation technology based on the time-lapse shooting of slightly different pictures, by overlaying and mixing transparent sheets with characters drawn on them in one frame.
In the 70s of the twentieth century a new kind appeared -computer animation, whichbegan to displace all previously known types of animation. Now, almost all modern cartoons have been done on the computer for a long time, and do not paint on tapes or mold from plasticine. The process of creating the first computer animation is very laborious. It looks like this: carefully laid out the basic poses and automatically selected intermediate. The first cartoon-like "Toy Story" was created four and a half years. To date, Russian animation is experiencing an upturn, and new high-quality animations are increasingly appearing on TV screens and cinemas.
On the purpose of creating cartoons are:
Developing
Teaching
Educational
Cognitive
Entertaining
By production:
Russian
Japanese
French
American
English and other
By duration:
Short
Full-length
By age interests:
Children's
Adults
For teenagers
Practical part
Questioning of students. (Annex 1)
I decided to investigate whether my peers love cartoons. For this, I conducted a questionnaire among students of the 2nd grade. The analysis of questionnaires showed that almost all students 98% like to watch cartoons, and only 2% do not like. And 44% love absolutely all cartoons, whether foreign or Russian. 8% prefer foreign cartoons, because they are colorful and interesting. And 48% - Russian cartoons, tk. they are cheerful and kind. I presented the results of the result in the form of a diagram (see Appendix).
To the question "What is your favorite cartoon?"Were named:
1. Mostly Russian cartoons -44%, foreign -8%.
2. When choosing your favorite cartoon, the criteria were:interesting– 46%, funny – 21%, kind – 22%, colorful - 11%.
3. Among the Russian loved ones, the cartoon is more often called "Masha and the Bear" - 15%, "Three Heroes" - 28%, "Smeshariki" - 13% among foreign ones - "Spiderman" - 9%, "GravityFolz" - 18% , "Winx" - 17%.
Children spend a lot of time watching the cartoons, this is evident from the results of the questionnaire: 56% of children of 2 classes, sometimes 15%, 18%, and rarely 11% - watch cartoons every day.
Based on the results of the questionnaire, it can be concluded that most children of primary school age choose cartoons in terms of interests. The most popular cartoons are "Three heroes" Russian cartoon and foreign popular cartoon "GravityFolz."
Create your own cartoon.
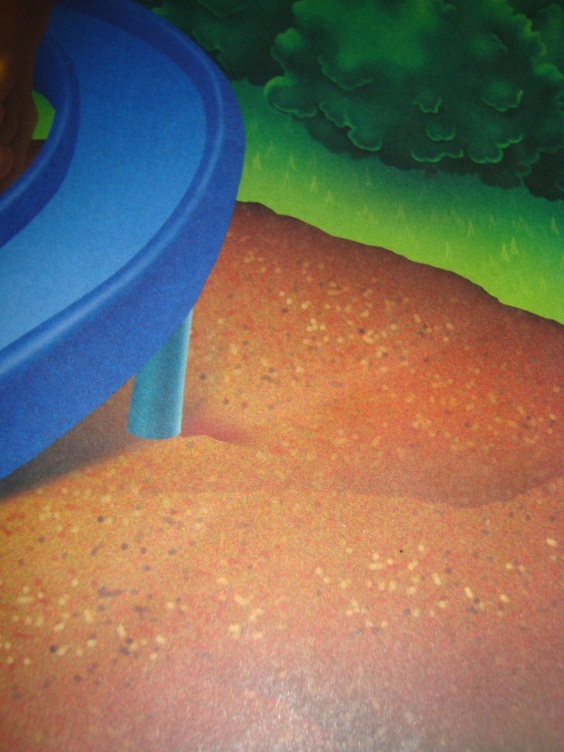
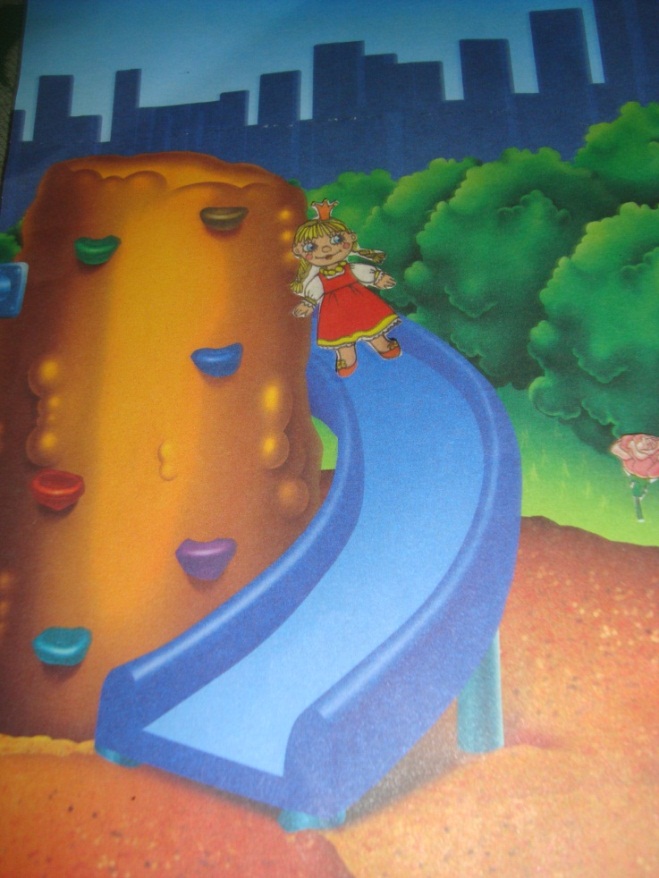
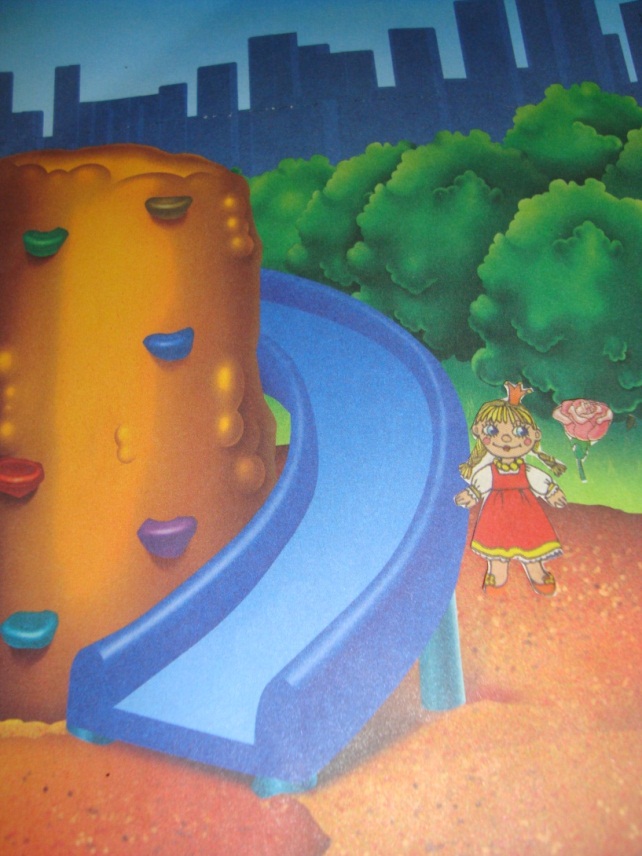
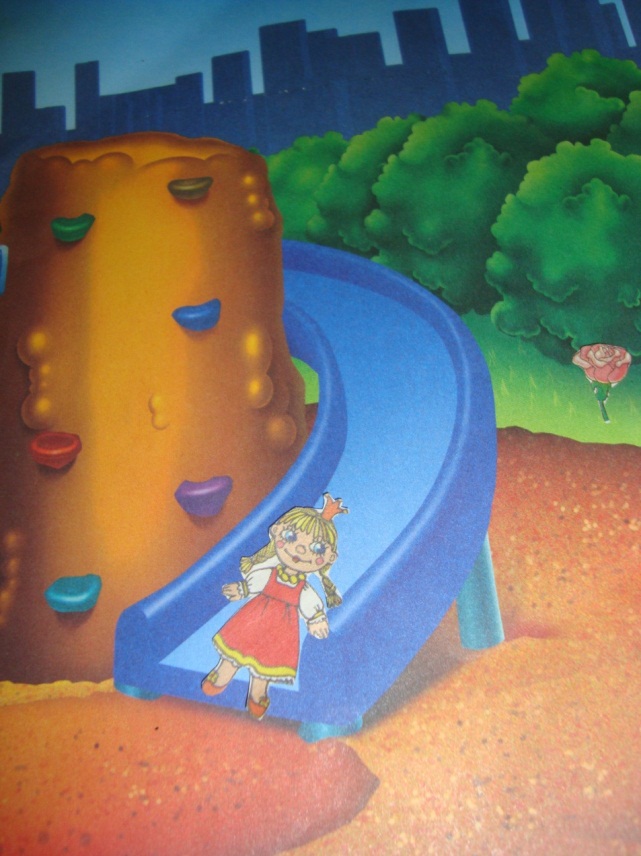
Then we moved on to shooting our cartoons. This pthe work included the execution of necessary blanks, shooting and installation.I needed a digital camera, a tripod, a lamp for lighting, a computer. For her animation she took the developing book "Spider-Man and His Friends", children's magazines "Neposeda" and "Country of Knowledge". The pages of the developing book became the background. Characters cut out of the magazines. Nakleila on paper, on the harvested background. By reshuffling the character and taking time-lapse shots, I got a cartoon.
First of all, do a couple of frames of an empty background and only then will the characters: a hill and a girl. For example, in the beginning, let's take a girl. We put it near the border of the frame, let the head first appear in the frame. Photographing. Move the girl forward about 1 cm, again take pictures, and do not forget to remove your hands from the frame, when photographing. After shooting 10-15 frames, scrolling frames at a fast pace (something like this will look like in a cartoon) and draw conclusions: like or dislike how it moves. Errors, as a rule, immediately noticeable. If you like ─ we continue shooting.
When everything is filmed, you can proceed to the second stage ─ editing. We take all our photos - frames and transfer them to the computer for editing. Installation will be done using the programWindowsMovieMaker, which goes in the standard set of the operating system Windows. It's very simple, launch the program, import our images and drag it to each corresponding frame. In the menu "Tools" - "Options" set the healing of images, by default there is 5 seconds, we will make 0,5 seconds. You need to add a soundtrack or voice a character. For this, we select the sound effects separately. To complete the "File" menu, select "Save movie file".
In all the captured cases, the received pictures were processed on a computer with the help of a special program "Film Studio", my mother helped me to put the footage on the music. (Annex 2)
The conclusion.
This work is not easy - shoot cartoons! The shooting of a minute cartoon requires about 200 shots. After all, in order to make the character's movement seem smooth, you need a very fast change of them - 24 frames per second! I showed my cartoons to classmates, they liked them very much.
In the process of work, I realized that my hypothesis was not confirmed. Watching cartoons is fun, interesting and easy, and it's not easy to do. Now I know exactly what a cartoon is! A cartoon is a painstaking work of many people, creativity, time and a very interesting activity!
Animation is a special kind of cinema art created by specialists who use different materials and techniques to create characters, and "animation" takes place by rapid change of frames.
Now looking at even a short cartoon, I understand that a lot of work has been done by a whole team of people.
Literature.
1. Asenin S. Screen Wizards - M., "Art", 1974. - 145s.
2. Great encyclopedic dictionary. М .: науч. edition "The Great Russian Encyclopedia", 1998, p.1434
3. I.Vano "Drawing film" (book on the Internet)
4. Hamburg E., Baker V. .. Artists of the revived drawing, USSR Union of Cinematographers, 1984.
5. Ozhegov SI and Shvedova N.Yu.Talk dictionary of the Russian language. M., LLC "ITI Technologies", 2003.-944 p.
6. Simon M. How to create your own cartoon - НТ Пресс, 2006.- 337с.
7. Websites on the Internet:
Annex 1
Application form
(for students of 2 classes)
and the results obtained during the survey.
Appendix 2. Images from the cartoon "Girl"
1. Rotoscoping, one of the earliest methods of animation, was invented by Max Fleischer in 1917. The process consists in projecting on the tracing-paper the movements of real actors shot on film, by sequential drawing.
For the first time this technique was used for the animation of the clown Koko from the series "From the Inkwell" by Fleischer Studios (depicted by Clown Dave Fleischer, brother of Max Fleischer). Later, in the early 30's, Fleischer used the same technique in cartoons about Betty Bup and to create Gulliver's movements in the feature film "Gulliver's Travels."
The method of rotoscoping has found wide application in animation, especially if in cartoons there were realistically drawn human characters, which are very difficult to animate.
2. Multiple camera was invented by Abe Iverx in 1933 and modified by William Garythi in 1937. The multi-plane camera holds several layers of art in a horizontal position to create a three-dimensional space effect. Each layer can be moved and removed from the lens by the required distance.
For the first time, the 7-level camera was used in the short film "The Old Mill" awarded by Oscar, then in "Snow White". Also used to create an underwater world in the "Pinocchio". 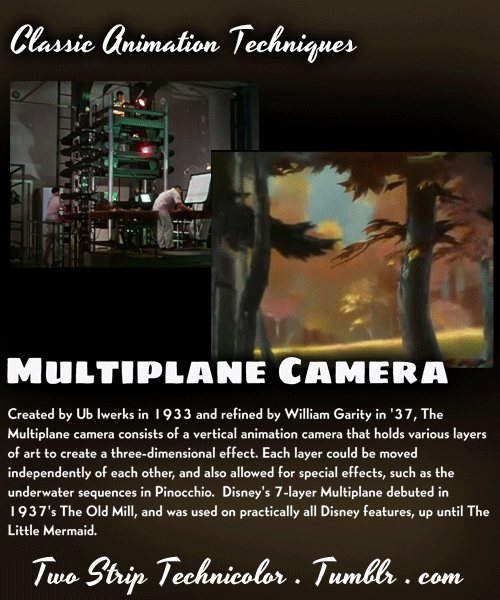
3. The stereoptic process is the answer of Max Fleischer to the Disney multidisciplinary cell. The main difference is the layers of art, held in front of the camera vertically. This process was used to create short films "The Poppy Seaman" and is especially noticeable in the series "Popey meets Sinbad the Sailor" and "The Sailor Popey meets the forty brigands of Ali Baba".
However, the decline of the studio in the early 40's and a sharp drop in the production of cartoons put an end to the stereoptic process. 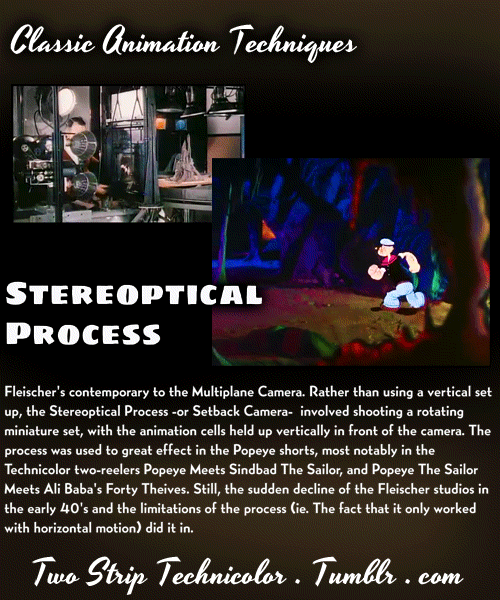
4. Traditional stop-motion animation involves moving the same figures frame by frame. The replacement animation uses those figures that are necessary for each particular frame. This technique was introduced by George Pal in the 1930s, when he created the puppet series Puppetoon. Careful planning and even more careful design of the figures allow animators to better convey the emotions of the characters and their facial expressions. Individually created figures, used each in their frame, allow puppet characters to acquire the smoothness of the movements of cartoon characters. 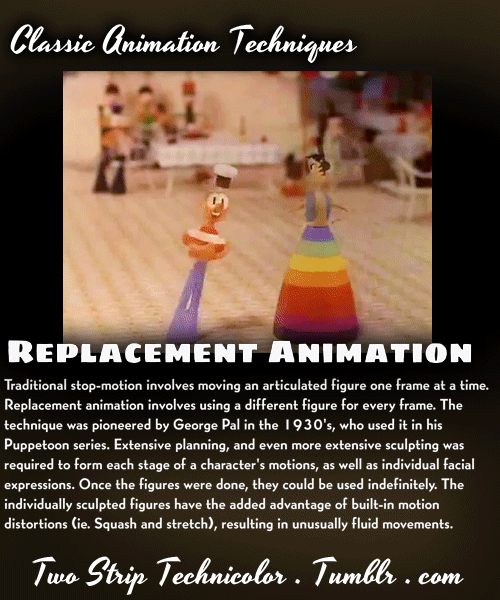
5. Photocopying was invented by Abe Iwiks in the 60s for the cartoon "101 Dalmatians", first used in some scenes of "The Sleeping Beauty" and was used to create the Oscar-winning short film "Goliath II". The technique is to translate animators' drawings directly to celluloid, without using expensive ink and saving time, and also retaining the pencil look and sometimes auxiliary lines (much to Walt Disney's displeasure).
Interestingly, the predecessor of photocopying was invented even earlier at the same Disney studio for the animated film "Pinocchio", when the constructed and working model of the Stromboli van was photographed and then transferred to celluloid using a photostat. 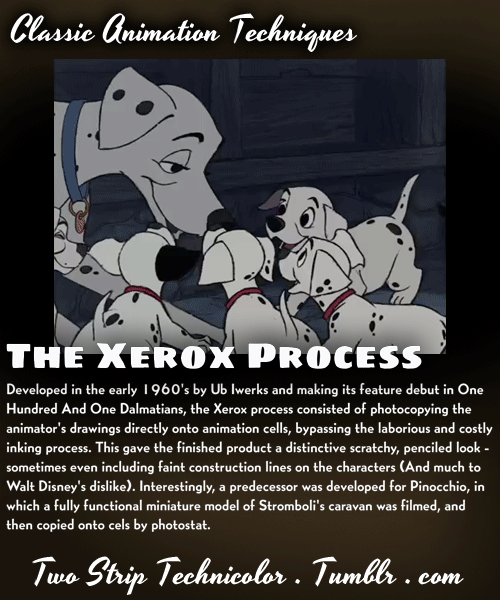
6. The photographer and engineer Herman Schulthuis worked in the Disney special effects department from 1938 to 1940 and created for Pinocchio, Fantasy and Bambi unprecedented effects at that time ... a description of which he kept in his notebook.
In "Fantasy" to create dancing snowflakes in the passage "The Nutcracker" Shultish attached the figures of snowflakes to the trains of the toy train, rolled them around and filmed; in the "Spring of the Sacred," the smoke effect was obtained with the help of ink divorce in a vat of water; ghosts in "Nights on Bald Mountain" - this is a reflection of the drawings on a polished sheet of metal; The effects of flicker and dew were achieved with the help of metal shavings, on which light fell from different angles.
Schulthuis was a talented inventor and photographer, and his interests stretched from radio and artistic restoration to the first computers. He died under strange circumstances in Guatemala in 1955. 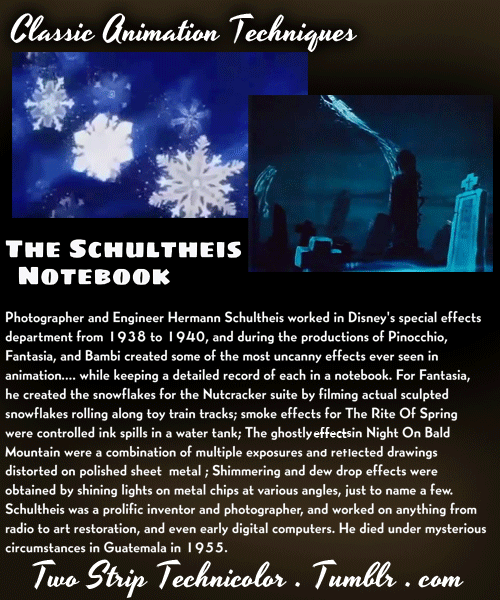
7. The era of traditional animation has seen many cartoons in which cartoons are side by side with real actors and / or scenery. In the twenties Max Fleischer used a combination of live filming with animation for his TV series From the Inkwell, Walter Lantz for Dinky Doodle, Walt Disney for the short film Wonderland of Alice (1923).
To achieve such a combination, an optical printer was used, connecting various elements, and sometimes the backgrounds were cut from the photos, onto which painted characters were superimposed.
Large studios used a more advanced method, Front Light / Back Light (front light / rear light): first they rotoscoped the scenery, and then drew suitable cartoons for them and animate them.
Animation elements, drawn in a traditional way, were first shot using back light, then on a black background. The resulting elements were connected to an optical printer.
These basic optical processes were modernized and used on the shooting of "Roger Rabbit" .. with minimal computer intervention. 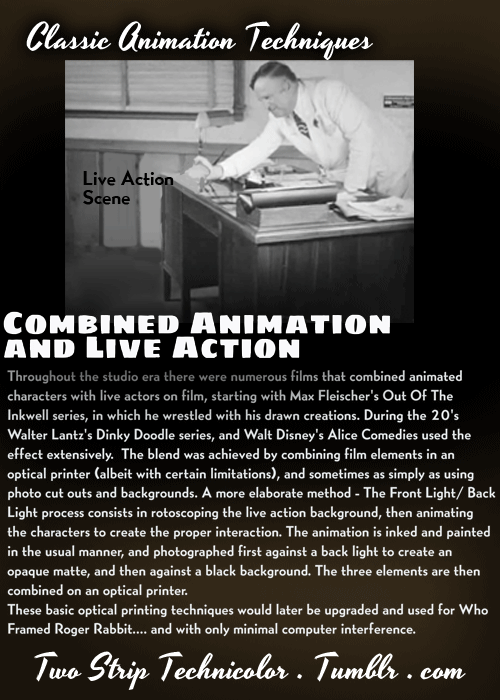
Publications on the topic
-
 How to build a network
Despite all the dislike of mankind for spiders, as well as the abundance of prejudices and terrible stories associated with them, the question is, like a spider ...
-
 Game Mouse. Mickey Mouse Games
How long ago did a famous cartoon appear, whose main role was played by the beloved Mickey Mouse? This hero was brought up by more than one generation of children, ...