
Children's project on how to create a cartoon. Examination of children on these topics. Questioning. Comparison of domestic and foreign cartoons

Creative project "Creating a cartoon" A student executed 4 "b" class GBOU Lyceum 623 them. I.P. Pavlov of the Vyborg district of St. Petersburg by Palevich Andrei St. Petersburg, uch. g

The idea to participate in the creation of this short cartoon was received by me with great interest and enthusiasm. In the course of working on the project, I learned that creating a cartoon was a very laborious and painstaking business, and a lot of effort had to be made to complete it.

Concrete experience should be the key to history, geography and calculations so that students, motivation and interest in learning can be increased. All these developments, albeit with different accents, goals and methodologies, begin with a proposal for the active participation of students in learning processes, offering them participation in specific operational processes, ranging from research, discovery of knowledge and ending with the development of work objects and mechanisms.
From this setting, a series of thoughts about work also appears. Group roles, didactic collaboration, documenting events, telecommuting, which are still important guidelines for many didactic experiences, have become a daily practice.
July 20, 1877 is considered the official date of birth of animation. This is the year of the creation of the praxinoscope, with which the cartoon cartoons were created and demonstrated, and the first animator is considered to be the French self-taught engineer Emile Raynot. Its author was Alexander Shiryaev, the choreographer of the Mariinsky Theater. For 3 months, twelve dancing figures (pupae) were filmed. The movements of the figures were taken against the background of motionless scenery, which were simply changed if a change of entourage was required. In 1910, Vladislav Starevich decided to make a documentary about the battle of two male stag beetles for a female. However, when illuminated, males became passive. Then Starevich made dummies of stag bells, instead of paws he put the wires and shot the scene frame by frame. His film “Lucanus Cervus” was the world's first puppet animation film. In the same technique, Starevich shoots the short film “The Beautiful Lucanida, or the Barbel of Warblers with Stags”, which was released in 1912, in which beetles played scenes parodying chivalrous novels. The film was a huge success with Russian and foreign viewers. The frame-by-frame technique of the puppet animation was then completely unknown, therefore, in many reviews, there was astonishment at the incredible things that could be achieved with insect training.

How to make cartoon making cartoons is simple and so much fun that you can offer this activity from kindergarten to first grade secondary schools. Cartoons are a genre that attracts and stimulates young children just like teenagers, and is a form of language that is extremely close and natural to them.
The laboratory aims to eliminate all the steps necessary to create a cartoon: thematic design and selection, writing scripts, creating backgrounds and characters, digital animation, dubbing and sound. But let's see how the cartoon develops. 1 The idea of the subject. Beginning with writing in writing, the focus is on the message you want to link using moving images. You may find it difficult to tell interesting story in minutes; a good story always has a problem to solve: telling how it is transmitted is history.
The further rapid development of animation contributed not only to the films made earlier, but also the development of technical progress. Walt Disney created the most popular cartoon character in the history of the animation of Mickey Mouse. In the same year, his first animated animated film “Steamboat Willie” was released. 1936 The Soyuzmultfilm studio (originally “Soyuzdetmultfilm”) was founded in the USSR. The first Soviet animated series Mowgli, dir .: R. Davydov. The first computer cartoon called "Kitty" was created by students and teachers of Moscow State University at BESM-4, in 1968 ... Nowadays, most cartoons are created using a computer to minimize the number of drawings that need to be done by hand.

Very useful for building stories with a consistent Propp map structure. Preparation of cards takes several days, as children must have a well-digested function; At the same time, it is appropriate to perform exercises for recognizing functions in famous fairy tales.
For example, they ask questions to the boys: who is the hero? Tale: 21 distribution applies to children. Comrades continue in order: first, who has a card 1, then 2, etc. the story continues until the cards are exhausted. It is interesting to record interventions, correct chaotic exposures and make their order.
At the first stage, we were asked to invent and formulate the scenario of the future cartoon, that is, a short story that we would like to put on the screen. At the second stage, we proceeded to the production of scenery and characters for our cartoon. For this purpose, all simple objects at hand, such as pencils, pens, fallen leaves, needles, berries, twigs, etc., were used.

The child pulled a fishing card from the deck and, by voice, had to say what happened before the card was communicated and how it continued after the story. First and later, each child draws a card from his deck and, taking into account the situation with fishing, which will be central, you will have to tell about the antecedent and the conclusion. Full tale: each child has his own deck of cards. It is discussed with the group that chooses the idea that best represents the message you want to convey, and begin writing the topic.
At the third stage, we had to work with a digital camera. Any, even the smallest, change in the position of the characters and scenery was recorded on the camera. So we got a sequence of hundreds of photos. This was a blank for the future cartoon. The result of the work done was: 1. I got an idea of how cartoons are created 2. I got the skills to work independently with a digital camera and a video editing program 3. I had a new hobby. All cartoons from the beginning to the end are made by me independently under the guidance of a teacher. I am not alone in this, my friends also made cartoons. Some of the cartoons we created have already participated in various contests and events: three cartoons participated in the Ecological Fairy Tale competition, in the Star of Luck kokurs cartoon “Three Leaves” took 1st place, cartoons were created according to the rules of the Russian language. The guys continue to get involved in this business, some of us continue to shoot cartoons.

With regard to communicative competence, it is interesting to have an idea about the practice of video recording and about the contribution that it provided during the acquisition process and in improving writing skills: Students can instantly translate what they are working on and visualize their own thinking, structuring and analysis of the processes underlying at the heart of the text itself. Then the subject is divided into a series of sequences, prepare the script script and dialogues. It is best to register immediately for the narrator’s voice and dialogue, because according to the length of the story you will need to make a sequence of synchronized pictures with sound.
MOU "Mogoytuy Secondary School No. 2
behalf of Yu.B. Shagdarova "
Scientific and practical conference
Project
"Cartoon do it yourself"
Fulfilled: Zhamsuev Kirill Bayaskhalanovich,
student 2 "G" class
MOU "Mogoytuyskaya school №2
behalf of Yu.B. Shagdarova "
Supervisor:
When a general plot is drawn, the details can be developed by drawing a storyboard, a kind of comic strip, drawn on paper in a spatial and temporal sequence, with descriptions of specific scenes and images. Simple sketches of stylized symbols are enough, only with the outlines of other elements and sketches of the background. Storyboarding is useful for several reasons: it makes the boys reflect in the logical structure the sequences necessary for the development of the story; helps plan continuity details; When setting up single scenes, a storyboard serves as a general plan for sorting sequences.
Batoeva Dorzhopagma Batomunkuyevna
Can
2015
Brief annotation.
This project was created primarily for the children to develop their creative abilities, autonomy and imagination through the creation of a cartoon with their own hands. Therefore, the work presents a step-by-step sequence (algorithm) for creating cartoons at home, which anyone can master, having at hand the usual Lego designer, a computer, as well as photo, video and sound recording equipment. Here you can also get acquainted with the author's advice, which can be used to create cartoons. It is safe to say that by attaching a fantasy, you can attract a lot of viewers for the premiere own cartoon.
The approach is to consider the storyboard is not only a finished graphic product, but, above all, a useful tool for both teachers and children. Creating a storyboard involves getting new knowledge by manipulating and editing multimedia objects based on a descriptive structure. Recent digital narrative research has deepened the relationship between collaborative storyboard writing and disciplinary training. The storyboard facilitates the organization of drawings, images, mechanisms for describing what happens on the stage, and enumerating media for combining.
Everyone loves cartoons. But few people know how they are created. And many do not even realize that cartoons can be created at home. And this is a very interesting and entertaining process.Relevance This project consists primarily in the fact that through the creation of a cartoon with their own hands, modern children develop their creative abilities, independence and imagination.
In fact, for each scene that needs to be set, students must specify the appropriate text part, effects, transitions, music, and dialogs. Having a well-done storyboard means developing well in a cartoon building. It is recommended to focus on a collaborative approach to writing a storyboard through the creation of working groups of 2-3 students. Creating storyboards as didactic activities allows not only to display information, spatial and temporal organization of scenes and a common vision of history, but also to discuss and disagree with ideas, activate problem-solving strategies, create a joint action plan.
Project Theme
: "Cartoon do it yourself"
purpose
: create a cartoon at home
Tasks:
master the ways to create cartoons;
acquire skills in working with a camera, recording equipment, computer;
to master the program for creating videos “Film StudioWindowsLive», « PinnacleStudio 15";
Then you can try different facial expressions, to which the game is more related than other eyes and mouth. Then the study of the character ends with the installation of various possibilities of movement. Children are the difference and collection in the "bookstores" of background drawings and drawings of characters. Animation often involves moving characters in the background, and the software generates images of each individual frame: the work is similar to the puppeteers. Guides and manuals are available to help you overcome any difficulties.
The animation of the stop motion involves many methods that may seem completely different at first glance, but which are actually very similar, only changing the material used to create scenes and characters. Usually you photograph an object to animate with a webcam or camera, it moves slightly and takes another click. The sequence of quickly projected images gives an idea of the continuous movement of fluid.
develop creative thinking and speech
Hypothesis: this project will find its popularity among children if:
The possibilities of this project will be expanded by introducing a circle on this topic at school.
Stages project implementation:
Theoretical (familiarity with the history of the creation of cartoons, equipment, technology).
To create scenes and characters, you can use a variety of materials: cutouts of paper and cardboard, clay, objects and materials of all kinds, everything that offers fantasy. It offers the opportunity to work on four types of levels: raster image, vector image, camera image capture and audio. It includes simple and intuitive drawing tools for creating wallpapers and animated characters. Drawing characters on paper 4 Animation Once you have clarified these aspects, you can start creating animations.
Practical (realization of theoretical skills).
Step by step sequence of creating a cartoon with their own hands.
Createscenario for your movie.
Think throughimages of heroes and scenery on which the movie will take place.
To makephoto , moving the figures of the characters in accordance with the scenario.
There are many programs that provide drawing space and many very intuitive tools that help children understand how they are working right now to create characters and scenes. Using a graphic tablet written on an electronic pen greatly simplifies the process of drawing. 5 Animation software There are many methods and solutions that are more or less practical and economical to animate, depending on the type of available computer equipment and the software used.
Pick upsounding method movie according to the script.
To mount a movie in a programmeWindowsLive, PinnacleStudio (or any other) installed on your computer.
Scenario.
The first steps to create your own cartoon are the most important. You need to maximize your creativity and imagination. It is an interesting scenario - this is half the success in creating your film. Two options are possible:
The principle on which the animation software is based. Using the service is easy and animation is achieved by dragging items into the desired setting. This method of animation "step one" is to create characters and background, and then when creating individual images after a slight change in the position of elements in the scene. When you reproduce a sequence of still images, you have the illusion that the objects of clay are moving. Animation of the "characters" is achieved using traditional step-by-step technology: with a webcam connected to a computer, the individual images that make up the movement are captured.
Script you can come up with your own;
Make a movie, based on your favorite cartoon.
I chose to base my cartoon film the fictional scene of the well-known cartoon "Ninja Turtles". Since I was given a Lego designer for the New Year, I wanted to use it in my cartoon, and I also liked being in the role of a scriptwriter.
Between a click and a number, the clay models are manually moved over the set. The frames are directly imported and assembled sequentially with special software, controlling each image on the monitor. In fact, in the motion stop animation, the object is stationary with each click. The advantages that a computer uses are extraordinary compared to traditional methods. When digitally controlling the frame, you can see on the monitor an image that you are going to resume with transparency with the previous ones, which allows you to perfectly reposition.
Creating images of heroes and scenery.
Carefully read your script, and then carefully consider the images of the characters and the scenery of the scenes on which the action will take place. They must be bright and interesting to attract the attention of viewers.
In my cartoon, I used one scene - a meeting of Ninja Turtles and Crangs. The most important thing is to make the right background or scenery. My background was the boxes and white sheets of A4 format (Appendix 1), as well as the underwater mobile base of Ninja Turtles I collected from Lego. It is important here that foreign objects do not fall into the frame, otherwise the attention of the audience will be switched to them. Also here you can show imagination and add figures of other designers.
This device is called the onion skin, because it allows you to see different phases of movement, as if they were stratification. For the background, we use color paper and cardboard, as well as photos taken from old calendars, on which we place plasticine models. At the end we move on to installing different scenes, add titration and sound. Just a microphone connected to a computer and software to record sound and start recording; we can do all the tests we want to set the rhythm, tempo and pitch to give the words, and therefore choose the best soundtrack.
Photographing.
At this stage you are implementing your script. It is necessary to take photos by moving the figures of the characters in accordance with the script.
Install the camera so that only the action scene of the cartoon is in the lens field. You can use a tripod.
Seal the sheets and fasten them so that they cannot be accidentally moved, for example, with scotch tape or regular stationery glue.
We all love to listen to the voices of people who speak on. At the same time, we don’t like to hear our recorded voice, because we don’t recognize it. These are the voices of children who make the story unique, authentic and exciting! At the stage of car duplication, there is no need to discourage all the tests are possible, the recording is repeated several times until the sound and expression satisfy us. Everyone can grumble or shout: this leads to an awareness of the chances of each person to assert the “volume” of his voice and, above all, adapt to the circumstances and space.
Next, work on the scene. Put the heroes in the desired position and start shooting, moving the frame and frame arms and legs in the right direction, thereby creating movement (Appendix 2).
Take as many photos as you need to reveal the intent of your script.
Tip: in order to portray, for example, a hero's leap, you can attach the figure to the scenery or background on ordinary clay, then lower it or raise it higher and take a picture. When connecting frames, it turns out that the hero jumps.
So, having a camera and a tripod and owning simple film making skills, you can easily take the necessary number of shots to proceed to the next steps.
Sound.
To sound your cartoon, you can use any recording equipment: voice recorder, telephone, etc.
Here, the most important thing is to follow the script, maintain the necessary pauses during the transition from stage to stage and change the voice for your heroes (you can invite friends for such an important matter).
When creating my cartoon, I used a phone recorder "Samsung».
Mounting the movie.
This is an important part of creating a cartoon. Here, the most important thing is to choose the necessary time for switching frames so that the “voice over” corresponds to the pictures, and the scenes must clearly follow each other. After all, the perception of the film by the audience depends on it. You can use music, various sounds, titles, and so on (Appendix 3).
Tip: Carefully familiarize yourself with the movie making program that is installed on your computer, use all of its features.
Conclusion
It's no secret that most of the time modern children spend at the computer and watching TV. Animated films are the kind of art that especially attracts children. That cartoons form an idea of good and evil, show how to behave. And creating your own cartoon solves many other tasks.
As a result of this project, the following skills are acquired:
Determining the order of action, planning your work;
The ability to combine various methods of work to achieve the set creative task;
Creating a story for your movie;
Shooting animated film time-lapse shooting;
Mounting your own movie.
As a result, having done a lot of work on creating our own animated film, we can confidently assert that the goal set at the beginning of the work has been achieved, the tasks have been accomplished.
Conclusion: having done a lot of work on creating our own animated film, we can confidently assert that the hypothesis posed at the beginning of the work is confirmed. The project is gaining its popularity among children and my classmates because:
It will cause a certain interest, thanks to an interesting scenario and high-quality preparation of the material;
Perhaps on this topic in the school circle will be opened.
The goal is achieved, the tasks are completed.
Enjoy watching the cartoon, made by hand.
The duration of the cartoon is 1 minute.
Content
Brief summary ………………………………………………………………… .2
Annotation …………………………………………………………………………… 3
I.Main part.
Step-by-step sequence of creating a cartoon with your own hands .........................4
II. The practical part.
Scenario ……………………………………………………………………… 5
Creating images of heroes and characters ... ... ... ... ... ... ... ... ... ... 6
Photographing …………………………………………………… ..7
Sounding ………………………………………………………………… .8
Mounting the film ……………………………………………………… .9
Conclusion ………………………………………………………………………… .10
Appendix …………………………. ……………………………………… ..11
Annex 1
Creating images of heroes and characters
Appendix 2
Photographing
Appendix 3
Mounting
Related publications
-
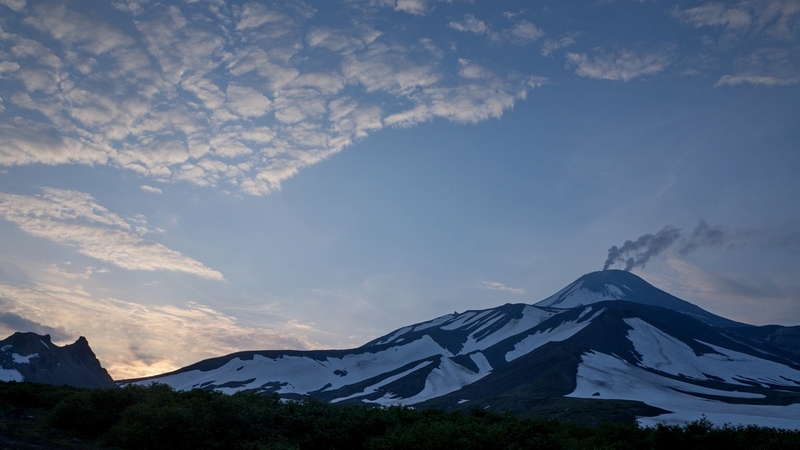 Avachinsky Volcano (Avachinskaya Sopka, Avacha, Avachinsky Volcano, Avacha Volcano, Avachinskaya Sopka)
March 31st, 2013 Today we had an early ascent, as climbing Avachinsky takes a lot of time from untrained tourists ....
-
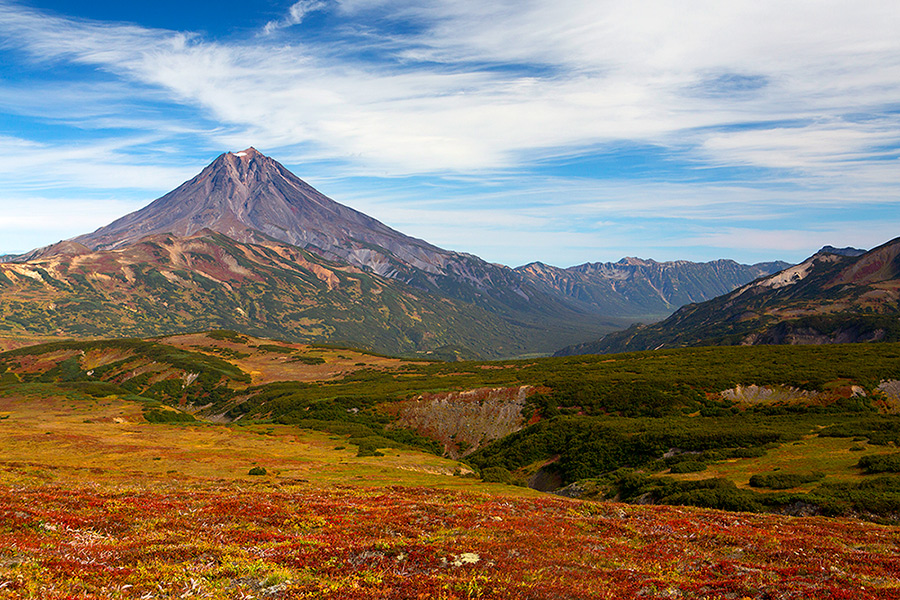 Mountains and ridges of Kamchatka
The Kamchatka Peninsula is the most unique mountain region in Russia. Kamchatka Territory is located in the north-east of Russia. Occupies territory ...