
How to make a mini tractor at home. The choice of engine and transmission. Getting Started.

As a rule, a mini tractor can be made on the basis of any engine. This could be an engine from Dnipro, from a walk-behind tractor, a Muscovite, or from an Ant motorcycle; for more details, see our selection: home-made mini-tractors (video).
And these are only the most common models. You can experiment in any direction using the engine and from other vehicles.
The self-made mini-tractor with a motor from the Dnipro motorcycle is equipped with a UAZ steering column, the hubs are taken from the cultivator's support wheels, the traction is invented by its own mind, the brakes are borrowed from the Volga car, the wheels are 16 diameters. The clearance is 30 cm, the base is 1.6 m, the track is 1.2 m, the mass of the unit is 600-700 kg, and the total cost of the whole structure is about 700 dollars.
The option with a monoblock engine has most of the parts from the car "Volyn". In terms of quality, it is not inferior to the previous version, but it has its own characteristics: fuel consumption is lower and maximum speed is greater. But the number of gears is all the same, there are only three of them. At 4, a very strong vibration of the whole body starts due to the lightness of the design.
The third option has a high fuel consumption, but the maximum among competitors power. The saturation of the mini-tractor can be borrowed from any vehicle.
The idea with the engine from the ant is considered the most optimal, because the ant was already a traction horse before. It combines efficiency and high payload.
Homemade mini tractor video compilation
Any of these self-made mini-tractors will become an indispensable au pair that will facilitate your daily work.
How to make a tractor?
As is known, in agriculture the tractor is a great helper in business. The process of creating a homemade unit is somewhat different depending on the materials used, the planned cost of production, as well as your skills and imagination.
It is much easier to manufacture the tractor itself than a car or a motorcycle, because the excellent driving characteristics and appearance of the device are not its main qualities, this type of equipment requires, first of all, the ability to transport a certain load. This article describes the creation of a tractor on the basis of the VAZ-2102 with the addition of parts from the UAZ, but you can proceed from those parts that you can get.
Parts and tools
Here are only the main parts that will be required for the manufacture of a working model of the tractor, all the rest: choose the wings of the wheels, the seat, the method of mounting the headlights at your discretion.
For the manufacture of a tractor with your own hands, you will need
- frame;
- brake cylinder;
- cardan;
- steering;
- rear axle.
For the manufacture of the tractor body:
- sheet iron with a thickness of 5 mm.
Mounts:
- bolts and nuts;
- rubber couplings.
Instruments:
- welding machine;
- bulgarian;
- gearbox from electric car;
- lathe;
- wrenches and screwdrivers.
How to make a tractor
Frame upgrade
The frame requires only one addition: instead of the cut-off rear, a small (about 10 cm) piece of channel is welded, and the rear axle will be attached to it by welding. The hitch must also be welded to the rear of the frame in order to be able to haul the cart. After making small changes, the engine will be bolted to the front of the frame and the front axle attached.
Engine enhancement

Rear axle
The Uazovsky bridge will be used as the rear axle of the new unit. Since you need to make a standard (short) half-line, you will need to shorten a long stocking, you can do this with the help of the grinder. 
To shorten the axes, do the following:
- Cut off the flange.
- In the middle of it, make a hole for the semi-axis.
- Insert the half shaft into the hole.
- Weld the parts to one another.
- Cut off the excess part of the half shaft.
The rear axle is attached to the frame with two pipes with a square profile, welded at an angle of about 120 degrees. The base of the structure is welded onto the regular rear axle cushions. One of the ends is attached to the frame, and the second is subsequently connected to the rear.
Front Axle Device
Front axle: hubs, side racks, turning fingers, bearings are taken from the VAZ. Attachments for the front wheel wings are welded to the uprights. Here is the steering rod.
From UAZ will be taken steering column, tie rod and steering gear. To fasten the latter, a special crossbar is welded to the frame.
Body fabrication
Body for a homemade tractor will have to do on their own. It all depends on your imagination and desire for functionality.

To protect the metal structure from corrosion, it will need to be painted. The body is attached to the frame with bolts.
You can watch the video about making a tractor with your own hands on this page.
Domestic craftsmen are able to design almost any device. Self-made minitractors and high-grade tractors are not a difficult design task for them. We present to your attention a selection of videos about homemade tractors.
Handmade with elements from cars
1. A mini tractor with a frame like that of the K700 - it also breaks in half for turning. The drive and steering system was installed from a VAZ 2109 car. It pulls this all-wheel drive iron horse “Tula” engine. The author of the design and invention is Mikhail Poddoskin.
2. The next instance is a homemade tractor equipped with a gearbox and engine from the Zaporozhets car. As the frame used channel 100 millimeters. To use attachments, a hydraulic system is installed in the tractor.
3. Tractor equipped with an engine from the car "Oka". It has four-wheel drive and a good hydraulic system. The rear lights are installed on the Gas 53.
Mini tractor from different parts
1. Video recording with a homemade tractor, the traction unit on which is installed from the Chinese heavy motoblock ZIRKA. Engine power is only 10 horsepower.
2. The next unit has a UD-15 engine. The ignition system, that is, magneto, rotates in the opposite direction. Gearbox and flywheel - from the Dnepr motorcycle. The transmission of torque to the wheels is obtained through the use of a chain transmission. For hydraulics installed pump NSH10.
3. Another exhibit with the engine UD-2, 8 l / s. according to the recommendations of the author - better UD-25. The bridge is from ZIL, and the box is from GAZ-51.
The advantages of homemade tractors are obvious. They can be independently manufactured by each person, the cost of parts for such devices is lower than for factory ones, they do an excellent job of processing small areas of land. In addition, many parts for a homemade tractor can be found in your farm.
Consider in detail the question of how to make a tractor with your own hands.
1 Preparation of drawings
Despite the fact that any tractor, whether it is of standard dimensions or a motor-tractor, consists of at least hundreds or even thousands of parts, everyone who can master the scheme shown in the form of a simple drawing can assemble it. Thanks to the schematic drawing, the tractor assembly itself is similar to the standard constructor, where element A is connected to element B, then the detail AB with element C and so along the chain.
Although it is worth noting that in our country there are certainly enough self-taught masters who can “keep the drawing in mind”, that is, perform the same sequential actions as with the drawing, only follow imaginary instructions. However, this is far from all. He who does not possess such experience is unlikely to be able to assemble any kind of construction without asking for help from a previously blackened scheme.
In case you had “bad relations” with drafting at school and you are not able to organize a drawing of a scheme of a full-fledged home-made tractor, ask your friends, relatives or friends who understand this business better than you. In extreme cases, Google search will help you find any information.
Before you start drawing a scheme yourself, decide what kind of tractor you want to make, on the basis of what it will be made. For example, homemade tractors can be:
- tracked;
- wheeled.
They are made on the basis of:
- power tillers. The tractor from Niva (one of the most famous motor-blocks in the Russian Federation) is very popular in Russia;
- car engines. Moreover, the engines can be used as a passenger car, and cargo, cargo-passenger. By the way, the engine of the GAZ-66 is very suitable in order to perform a homemade tractor with his own hands, which will have high power. Often there is a tractor from the UAZ;
- UD-2 is a universal engine used as an additional motor in installations that are equipped with an electric generator, and also as a engine in a self-made tractor;
- popular people homemade tractor 4 × 4. A homemade 4 × 4 tractor is also called a break.
Having decided on the above question, you can safely proceed to the drawings. In this case, after creating the scheme, be sure to make a list of available parts and assemblies, and a list of those elements that need to be purchased, after which, buy the missing parts. Only after the entire list of parts will be in your garage, you can begin assembling the structure.
1.1 Design features
How to assemble a tractor with your own hands? This is not a big deal. If you have drawn the scheme correctly and prepared all the necessary details, making a tractor with your own hands goes into the practical part. The difference in modifications and options depends on the means and skills that you have. Below we describe the most optimal design:

If you chose to make a caterpillar tractor with your own hands, because in the course of work it does not damage the upper fertile soil layer, for simplicity, buy a new module, in which equipment there are wheels and a seat. Alternatively, all items can be assembled by yourself at home. However, this design will be devoid of drive. Assembled, tracked tractor with their own hands is controlled by turning the transmission-motor unit. For this purpose, it is recommended to use a standard steering wheel.
Motoblock should be added to the hinge of the module with the seat, for carrying out the land works also need to take care of the hinge. To realize this option, assemble the frame using a wheel pair and rolled metal. Then install on it two trailed units, a seat. Do not shock the wheels, it will negatively affect the speed of the device.
2 Tractor assembly
There is no single recommendation on what to take as a basis for the future unit and how to make a home-made tractor does not exist, what is affected by the presence of this or that equipment in your farm, from which the home-made will be constructed. Therefore, it is advisable to consider various options. If you do not have a motor-block made on the basis of a Zhiguli, the tractor will become an assistant much better.

2.1 Tractor based on Zhiguli
To build a tractor from the Zhiguli with your own hands, first of all develop a kinetic scheme that takes into account the balance of the structure. The device will include: engine, rear and front axle, reverse gear, cardan transmission. The engine will drive the front wheels. The chain torque will be transmitted sequentially to the gearbox, driveline, etc. The driving rear wheels will rotate as a result.
The frame is made of pipes and corners. Ensure that the fork and bush are in the correct position to allow the trailer to turn. Sheet is made of metal sheet. The height of the sides should not exceed 30 cm. Further mounted attachments and driver's seat. After check on the performance of your unit. The final step is priming and painting the surface of metal elements.
2.2 Tractor with engine D-21
Many craftsmen prefer to build a homemade tractor with a Chinese engine. The basis for taking Lifan, Forza, Zonshen. However, experienced designers recommend installing a reliable motor UD-2 or D-21. In the first case, the engine develops power up to 8 hp, in the second - up to 25 hp. Coupled with a 4-stroke system and air-cooled, this technique is not only successfully used for agricultural operations, but also for the transportation of goods. Consider the option with a diesel D-21.
To create the frame, take the pipe from the stacker. Pre-cut the semi-frame, borrowed from the T-25, weld the pipe to its front part, and 3.5 × 50 × 50 cm to the back metal sheet. Attach the hydraulic tank and the hitch with a hydraulic cylinder, which is also taken from the T-25, to the sheet. The front axle is better to buy in the factory version, otherwise there may be problems with axles. Take wheels from GAZ-52, rubber from Belarus 82 (8.3 × 20), which is made by the Minsk Tractor Plant.

The front wheels on the home-made tractor with the engine D-21 are placed on the T-25 (6.00-16). The hood, the beam - native, but above the fuel tank you need to patter. To do this, cook from a 3-mm sheet capacity to 40 liters. Place the finished product on the back of the tractor under the seat. Under the gearbox GAZ-52, weave the adapter plate. As a clutch take the basket, fork and release bearing from the combine Yenisei. Pre-remove half of the springs. The disc in the clutch fits any (from both GAZ and UAZ).
Grind a 3 mm seat under the basket in the flywheel. The primary shaft of the gearbox must be lengthened by 12.5 cm, shorten the cardan transmission from GAZ-52. The connection must be collapsible. Get a steering column from GAZ-52. Hydraulics on a homemade tractor is assembled from a P-80 hydrodistributor with a floating effect, pump NSh-10. It is placed through the plug connection in front of the engine. Pre-replace the regular bolt responsible for mounting the motor pulley.
You should not install the pump on the gearbox through the power take-off, because when the clutch is depressed, the hydraulic system will turn off, the rotational speed will be unsatisfactory.
2.3 Oka-based tractor
The tractor from the Oka do it yourself on the same principle as other Soviet cars. It all starts with the construction of the frame. Stock up on iron sheets and metal beams of the channel.

The design is a standard rectangular shape welded from metal corners. Front and rear axle assembled from the components of the Oka. The device is assembled with the engine of the Oka. However, before installing the engine increases the wheel clearance to improve patency.
The rear and front side members are reinforced as they bear the main load. A hitch mechanism should be provided for installing attachments. Drawings for further assembly can be found on the Internet. If you do not have the specified vehicle, it is not necessary to buy a new vehicle, the unit will also work in an idle state, since its individual elements are used.
2.4 Review of a homemade minitractor (video)
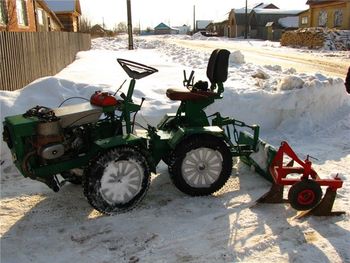
An interesting technical solution to a long-standing design problem, which allows minimizing the risk of damaging plants when cultivating row crops with a mini-tractor, was suggested by V. Chirkov from the working village of Lotoshin.
Track width can be easily changed. As they say, by request! After all, the front axle of this mini-tractor is sliding, and the required track width along the rear axle (taken from the GAZ-51 car and then shortened according to the original method) is achieved by replacing the conventional (right) wheel with a special hub.
I do not consider myself new to the creation of improvised means of small-scale mechanization. At least for the reason that many of my developments have long been "replicated" by other lovers to do everything with their own hands, and the best, such a mini MT-5 tractor, have won awards even for the main exhibition of the country. But I do not feel any special thrust to the motor-blocks. All the more so - to the "industrial". It often hurts many of their defects. Breaking parts, "burn" belt transmission. And what to restore! In addition to everything, too, in my opinion, light tillers for tillage for potatoes: stalled. Mowing is also children's fun. As, however, and when ensuring transport works (complete with the hook-on cart).
I am convinced that the farm needs a more versatile and powerful mechanical assistant - a mini-tractor with your own hands. Not indifferent to the creation of such machines: the seventh in the account. The new development (MT-7) has several large dimensions - it is as much as 650 mm longer. It would be possible to squeeze the whole structure (see illustrations) and in the previous dimensions, if I had at my disposal a good combined gearbox instead of two connected in series. But, alas: do-it-yourselfers often do not have ample opportunities to acquire the necessary units and blocks. Take another - natural astroma.
I, in particular, managed to put everything together in such a way that the maneuverability of the new mini-tractor, which is more powerful than the previous constructions, remained almost the same as that of the MT-5. Mainly due to the removal of the engine forward, like the well-known “Kirovets”. Although the ultra-high maneuverability of this machine when plowing is not so necessary. After all, with a capture width of 500 mm and more, you can at the end of each run and not unfold, but ... serve back. Moreover, the speed of the new homemade mini-tractor when plowing the land is 2 times greater than that of the MT-5.
We collect a mini-tractor with their own hands for free
The MT-7 is assembled mainly from serial units and aggregates of used equipment — that is, free of charge. All of them had, of course, to sort out, renew the worn parts. At the same time, the serial units and assemblies used should not be subjected to radical alteration. Firstly, because in the event of the failure of any of them, the replacement will not present any particular difficulties. Secondly, he was convinced: the alterations that some amateur designers willingly go to sometimes threaten to reduce the strength and reliability of what is being reworked.Take, for example, the primary shaft gearbox from the car GAZ-51. Using the KP-51 in the design of a homemade mini-tractor, it is difficult to resist the temptation to shorten it. But after all, cutting the shaft, remove the most, perhaps, valuable - the slots. And now, to secure the sprockets, gears, etc. on the shaft, you have to drill a bolt hole in it or pry through a keyway. Superfluous, in my opinion, work! In addition, the bolt is not a spline: with a large load it can simply be cut off. And be a homemade man wiser, do not shorten, save the shaft - no problems will arise. The splines are easy to put on a clutch disc with lining removed, to which elementary detail can be attached: flange, sprocket, etc. In addition, there is enough space on the shaft to install additional power take-off devices for other units: water pump, mowing machines, circular saw ...

There are no alterations, there are no alterations in the power unit, in the capacity of which the practically reliable engine from the GAZ-69 engine with a capacity of 55 liters was used. with, together with its gearbox (having three speeds forward and one back) and clutch. Torque from KP-69, which is in this case the primary gearbox, is transmitted to KP-51 directly, without “soft” connections, thanks to the flanges, fastened tightly with bolts. Similarly, KP-51 is also connected with the cardan flange installed on the main drive gear. Distortions here, of course, are not allowed.
The exact center of the longitudinal line of installation of successively connected power transmission units from the engine to the rear axle wheels can be observed if the preliminary assembly itself is carried out, as they say, in weight, placing everything on supports so that the nodes are in the same horizontal plane. Having achieved the absence of beats, the bolts on the flanges (couplings) are rigidly fixed. Then they transfer the construction to the mini-tractor frame, which is an isosceles trapezium (2400 mm high, with bases of 680 mm and and 730 mm), made of 120X50 mm channel for welding, wide buttocks out. Power and running knots are fixed “in place”, producing the final adjustment of the kinematics (so that there is no distortion anywhere). Then test the entire structure. Let the engine idle for a while, for which the rear wheels are raised above the ground on the box. Making sure that everything is in order, install the remaining components and parts. In fact, I am not a supporter of blindly copying someone else’s, even if the most successful, development.
I am convinced that it is more rational to focus only on the scheme chosen as a prototype, using in its design the details and possibilities that this homeowner has. Therefore, talking about the MT-7, I deliberately omit the description and the specific dimensions of the brackets, spacers and other "small things", especially the attachment of certain parts and assemblies. Everyone will decide the issues arising in the manufacture of a mini-tractor, including the replacement of, say, the second, additional gearbox from a GAZ-SI car with a power take-off and oil pump NSH (which, let's say, It was not at hand) on similar, taken from another technique. Compounding them into a single whole, it is only necessary not to forget: in KP-51, the gear teeth are straight, small; others have teeth and their cutting step is different. So, we need and the corresponding power take-offs.
Hydraulic pump connected by gas and oil resistant armored standard hoses with an oil dispenser (of any type) and a hydraulic tank, a power cylinder for lifting attachments, a dozer shovel, and a tipping body of the trailer.
Instrument panel - combined. The panel is taken from the KrAZ vehicle, the indicator devices are from other machines with 12-volt voltage.
On the right front wing of the MT-7, a rectangular hole is cut out - in order to see the position of the wheel while monitoring its progress during the earthing up.
Self-made bridges of a minitractor
Transforming front axle
The "highlight" in the design of the MT-7 is transforming front axle. The use of this technical solution allows you to easily and quickly change the width of the mines of a mini-tractor, which becomes a truly reliable mechanical assistant not only when plowing a field, vegetable garden, or performing other (usual for such machines) operations; You can finely cultivate men, plant and spud potatoes and other root crops, taking into account the recommendations of science and practice.
The idea I proposed is based on telescopic structural elements moving into each other. In this case, the dimensions of the structure itself vary significantly. For example, when hilling potatoes, the front wheels of the MT-7 move away from each other, and the track width becomes not 1080 mm, as usual, but 1,400 mm. For beds, cut every 700 mm, this is the best option.
And such a profitable innovation is achieved very simply. Instead of a single transverse cap, two channels are taken: 120X50 mm and 100X50 mm, fastened to each other with three Ml2 bolts. The length of the channels, respectively, 680 mm and 730 mm. When expanding the track, the bobs are unscrewed. The upper channel slithering gently along the lower channel extends to the required distance (320 mm in this case). Then both channels are bolted again.
Naturally, when extending the front axle, it is necessary to increase the length of the transverse thrust. The latter is composed of two segments of steel corners, nested into each other and fastened together by three M8 bolts. When you change the mine bolts unscrew. Spreading the transverse thrust to the desired length, re-fasten the corners with bolts.
Rear axle for a minitractor: long - shorten!
The rear axle from the GAZ-51 is attractive to many amateur mini-equipment designers. Its reliability, availability, finally. But that's the length ...
First of all, it is necessary, of course, to clean the ZM, removing the old oil and the sticky dirt. Then the rear axle is disassembled into separate parts. Unscrew the corresponding nuts, remove the half shafts (see fig.) And remove the differential from the crankcase.
On ZM stockings, the rivet caps are cut off with a sharp chisel and with the help of a piercer they “sink” them inside, in order to then carefully knock the stockings out of the body with a sledge hammer. If necessary, sometimes it is necessary to warm the seats with a blowtorch. And in order not to suffer later during assembly, achieving accurate alignment of mutually conjugated parts with each other, - take care of timely applying special scratches on the stockings and differential housing (chisel, until the components are separated).
Stockings are cut through the diameter of the seating surface to the spring cushion, after which the left cutter is shortened by 180 mm, and the right one - by 235 mm from the side of the differential. Cropped stockings are inserted back into their landing nests. And in order to fasten them thoroughly, through the old holes in the differential, where previously there were rivets knocked inside, new holes are drilled in stockings. The old ones (or specially made with a diameter of 0.1 mm large) rivets are driven into these holes and sealed flush with electric welding. After assembling the entire bridge, it is installed on a mini-tractor. To the frame of this ZM is mounted on bolts M12, passing through the holes, prudently done in the right places. Size A (see fig.) Is chosen such that the minimum track width along the rear axle is 1000 mm.
As for the semi-axes, they are drilled from the side of the fpans strictly in the center to a depth equal to the thickness of this flange itself. The diameter of the drill bit is slightly less than the diameter of the semi-axis. Further, the semi-axis is machined along the drill diameter to the appropriate length (see fig., Size B). For the right axle it will be 235 mm. and for the left - 180 mm. Each is inserted into its flange and is thoroughly brewed on both sides (use electric welding, not autogenous!]. So that the metal is not “released”, the semi-axis with the flange is periodically cooled with water. Then the semi-axes are shortened, removing everything unnecessary with a lathe.
Performance features other nodesand the elements of the front axle are clear from the illustrations. I will only note that from below, in the middle of the transverse beam-Schwepper 120X50 mm, a sleeve is welded, which is a piece of steel seamless pipe 30X5 mm (GOST 8734-75) 120 mm long. The axle is inserted into the hub in the form of an M20 bopt, passing through the holes in two transverse brackets (made from a 50X50 mm angle) screwed to the frame of the mini-tractor symmetrically with respect to the composite transverse beam. The latter is balanced on the axle-bolt, turning when driving on uneven soil at an angle, limited on both sides by stops from an angle of 45X45 mm. The brackets for more rigid fixation are additionally reinforced with two braces connected to the frame of the tractor.
Steering column- from the car UAZ-452. My mechanical assistant has it on the right side. Therefore, the mounting of the steering mechanism with the steering gear on the MT-7 itself is not particularly difficult. As for the lever, then it is removed from the spitz and then, turning, re-inserted, but in an upright position.
Tie Rod! With all the unusualness of its sliding, concisely stated above construction, it is not so difficult to make this important link. Especially for the one who is well acquainted with gas-surface welding. After all, all that is required is to weld the tips with ball pins to the elementary system of two parts of 30x30 mm sliding over each other, fastened with three M8 bolts.
Mini tractor do-it-yourself drawings, sizes


Wheels for a minitractor
So, when hilling, say, a potato, the front left wheel extends together with a channel of 100X 50 mm and a corner of 30X30 mm sideways by 320 mm. Wheel track on the front axle becomes equal to 1400 mm. Increases by the appropriate amount and gauge on the rear axle. But not due to the transformation of the latter, but by installing the left rear wheel in place of another: a special one that has a special design (see drawing).It is easy to see that it is removable from the usual, used only when working with an extended track, the wheel differs in the welded hub. Located between the “main” and “ring” parts of a disk cut by autogen, the latter increases the length of the rear beam. And instead of the standard for the MT-7 track on the rear axle - 1000 mm - it turns out (taking into account the "automobile" method of fastening this copes) 1400 mm.
From the front wheels with tires 6.5–16 (from the Volga car), the rear wheels of the MT-7 have tires from the MTZ-52 tractor, the size of which (6.5–20) makes it easy to mount them on Copes discs from the GAZ-51. Removable wheel is also no exception.
Tread pattern - "herringbone." To increase the grip weight of the mini-tractor, it is possible to recommend turning-up of removable loads or filling the chamber through the valve with about 2-D volume of water (with the onset of low temperatures - with a 25% aqueous solution of calcium chloride, which freezes at minus 32 ° C). With an increase in soil moisture, when the interconnection of its particles is disturbed, the increase in thrust force by the above method is not ensured. In these cases, it is advisable to reduce the pressure in the tires.

Attachments for tractors
In order for the mini-tractor to stand idle, you need to take care of a set of various mounted and trailed agricultural implements. And above all, for high-quality plowing, mechanized planting (say, the same potato, other valuable crops), inter-row processing and harvesting of the grown crop.I recommend for plowing to get one- and one and a half pound, which can be done on their own. These tillage implements are installed in the sockets of a special frame: welded, from a channel of 80X X40 mm (see photo of a mini-tractor, according to the Ukrainian mіnі tractor), a special adjustment mechanism, a rubberized wheel and an executive mechanism for the hydraulic drive of the suspension. And since the MT-7 when plowing, the right wheels go along the furrow, the plows are pre-installed with such a deviation from the vertical to the right, so that during operation they take a perpendicular position (compensation is given by the very inclination of the mini-tractor body).
Accordingly, the sock of each plow must be rotated by 1-2 degrees, but to the left. Then the resistance of the earth, “selecting” all the gaps, will turn the machine (again to the right), and both guns will be in the longitudinal plane of the mini-tractor.
The cutting of ridges is carried out with three hillers (see the corresponding illustration). When planting tubers, the hillocks are rearranged, respectively, to other nests, and at one approach of the mini-tractor, the tubers planted in the prepared furrow are filled with both eyeblocks from the two sides. At the same time, the third hiller, located 350 mm to the left of the second one and slightly behind it, cuts a new furrow for planting the tubers of the next bed. That is, in a single pass, the MT-7 performs both the collapse of the previous one and the preparation of a new groove.
When hilling potatoes, the front axle, as already mentioned, moves apart from one, left side to a gauge of 1400 mm. The rear left wheel is replaced by another - a special one, with a welded elongated hub (see option on the photo). And damage to the processed potatoes does not occur.

Related publications
-
 Mammoths - Ancient Prehistoric Animals
† Woolly Mammoth Scientific Classification Kingdom: Animals Type: Chordy Subtype: Vertebrates Class: Mammals Order: ...
-
 Prehistoric Giant Animals
Prehistoric mammals, giants living on Earth millions of years ago and forever extinct from our planet. Giant ...